Jenkins Automation Demo
In This Demo
- Integrate Invariant with Jenkins to test preflight network changes in an offline digital twin environment.
- Rapidly triage and identify the root cause of incidents using deep network drift detection in Invariant.
- Examine routing tables (RIBs), protocol sessions (BGP, IPSec), and other information in the network model after the proposed network configuration change is applied.
- Demonstrate network-as-code using native network config language.
Scenario
This demo involves a network team maintaining a code branch, "golden_branch", which holds network configs representing the current state of the production network as planned.
To plan or explore a potential change to the network, the network team can directly modify network configs on a separate branch. In this example, the branch is named "change_proposal", but in reality you would be more specific, and might cite a ticket number.
Jenkins is configured to pick up new changes and "build" them, where building means analyzing the network snapshot (with changes) for rule violations and generally looking for changes across all aspects of the network: routing tables (RIBs), protocol sessions (BGP, IPSec), etc.
We will now introduce a problematic change to demonstrate the tool.
Demonstration: Disaster Averted
We’re going to shut down the IPSec tunnels that connect our on-premise enterprise network to our AWS infrastructure. This will certainly cause an outage in our network, and our Jenkins build will fail and provide very detailed information about the extent of the outage.
We start by spelling out the change we plan to make. We will directly modify the network config file for border-1.cfg to show that we intend to shut down interfaces Tunnel1 and Tunnel2 on device border-1 .
--- a/p/demo/private/enterprise_quick/configs/border-1.cfg
+++ b/p/demo/private/enterprise_quick/configs/border-1.cfg
@@ -139,6 +139,7 @@ crypto ipsec profile ipsec-vpn-0dc7abdb974ff8a69-1
 !

 interface Tunnel1
+ shutdown
  ip address 169.254.25.162 255.255.255.252
  ip tcp adjust-mss 1379
  tunnel source 197.10.10.2
@@ -148,6 +149,7 @@ interface Tunnel1
  ip virtual-reassembly
 !
 interface Tunnel2
+ shutdown
  ip address 169.254.172.2 255.255.255.252
  ip tcp adjust-mss 1379
  tunnel source 197.10.10.2
We can commit that change in git as a new branch, “change_proposal”, and push it to the repo. The Jenkins task will pick up the change and run a build automatically.
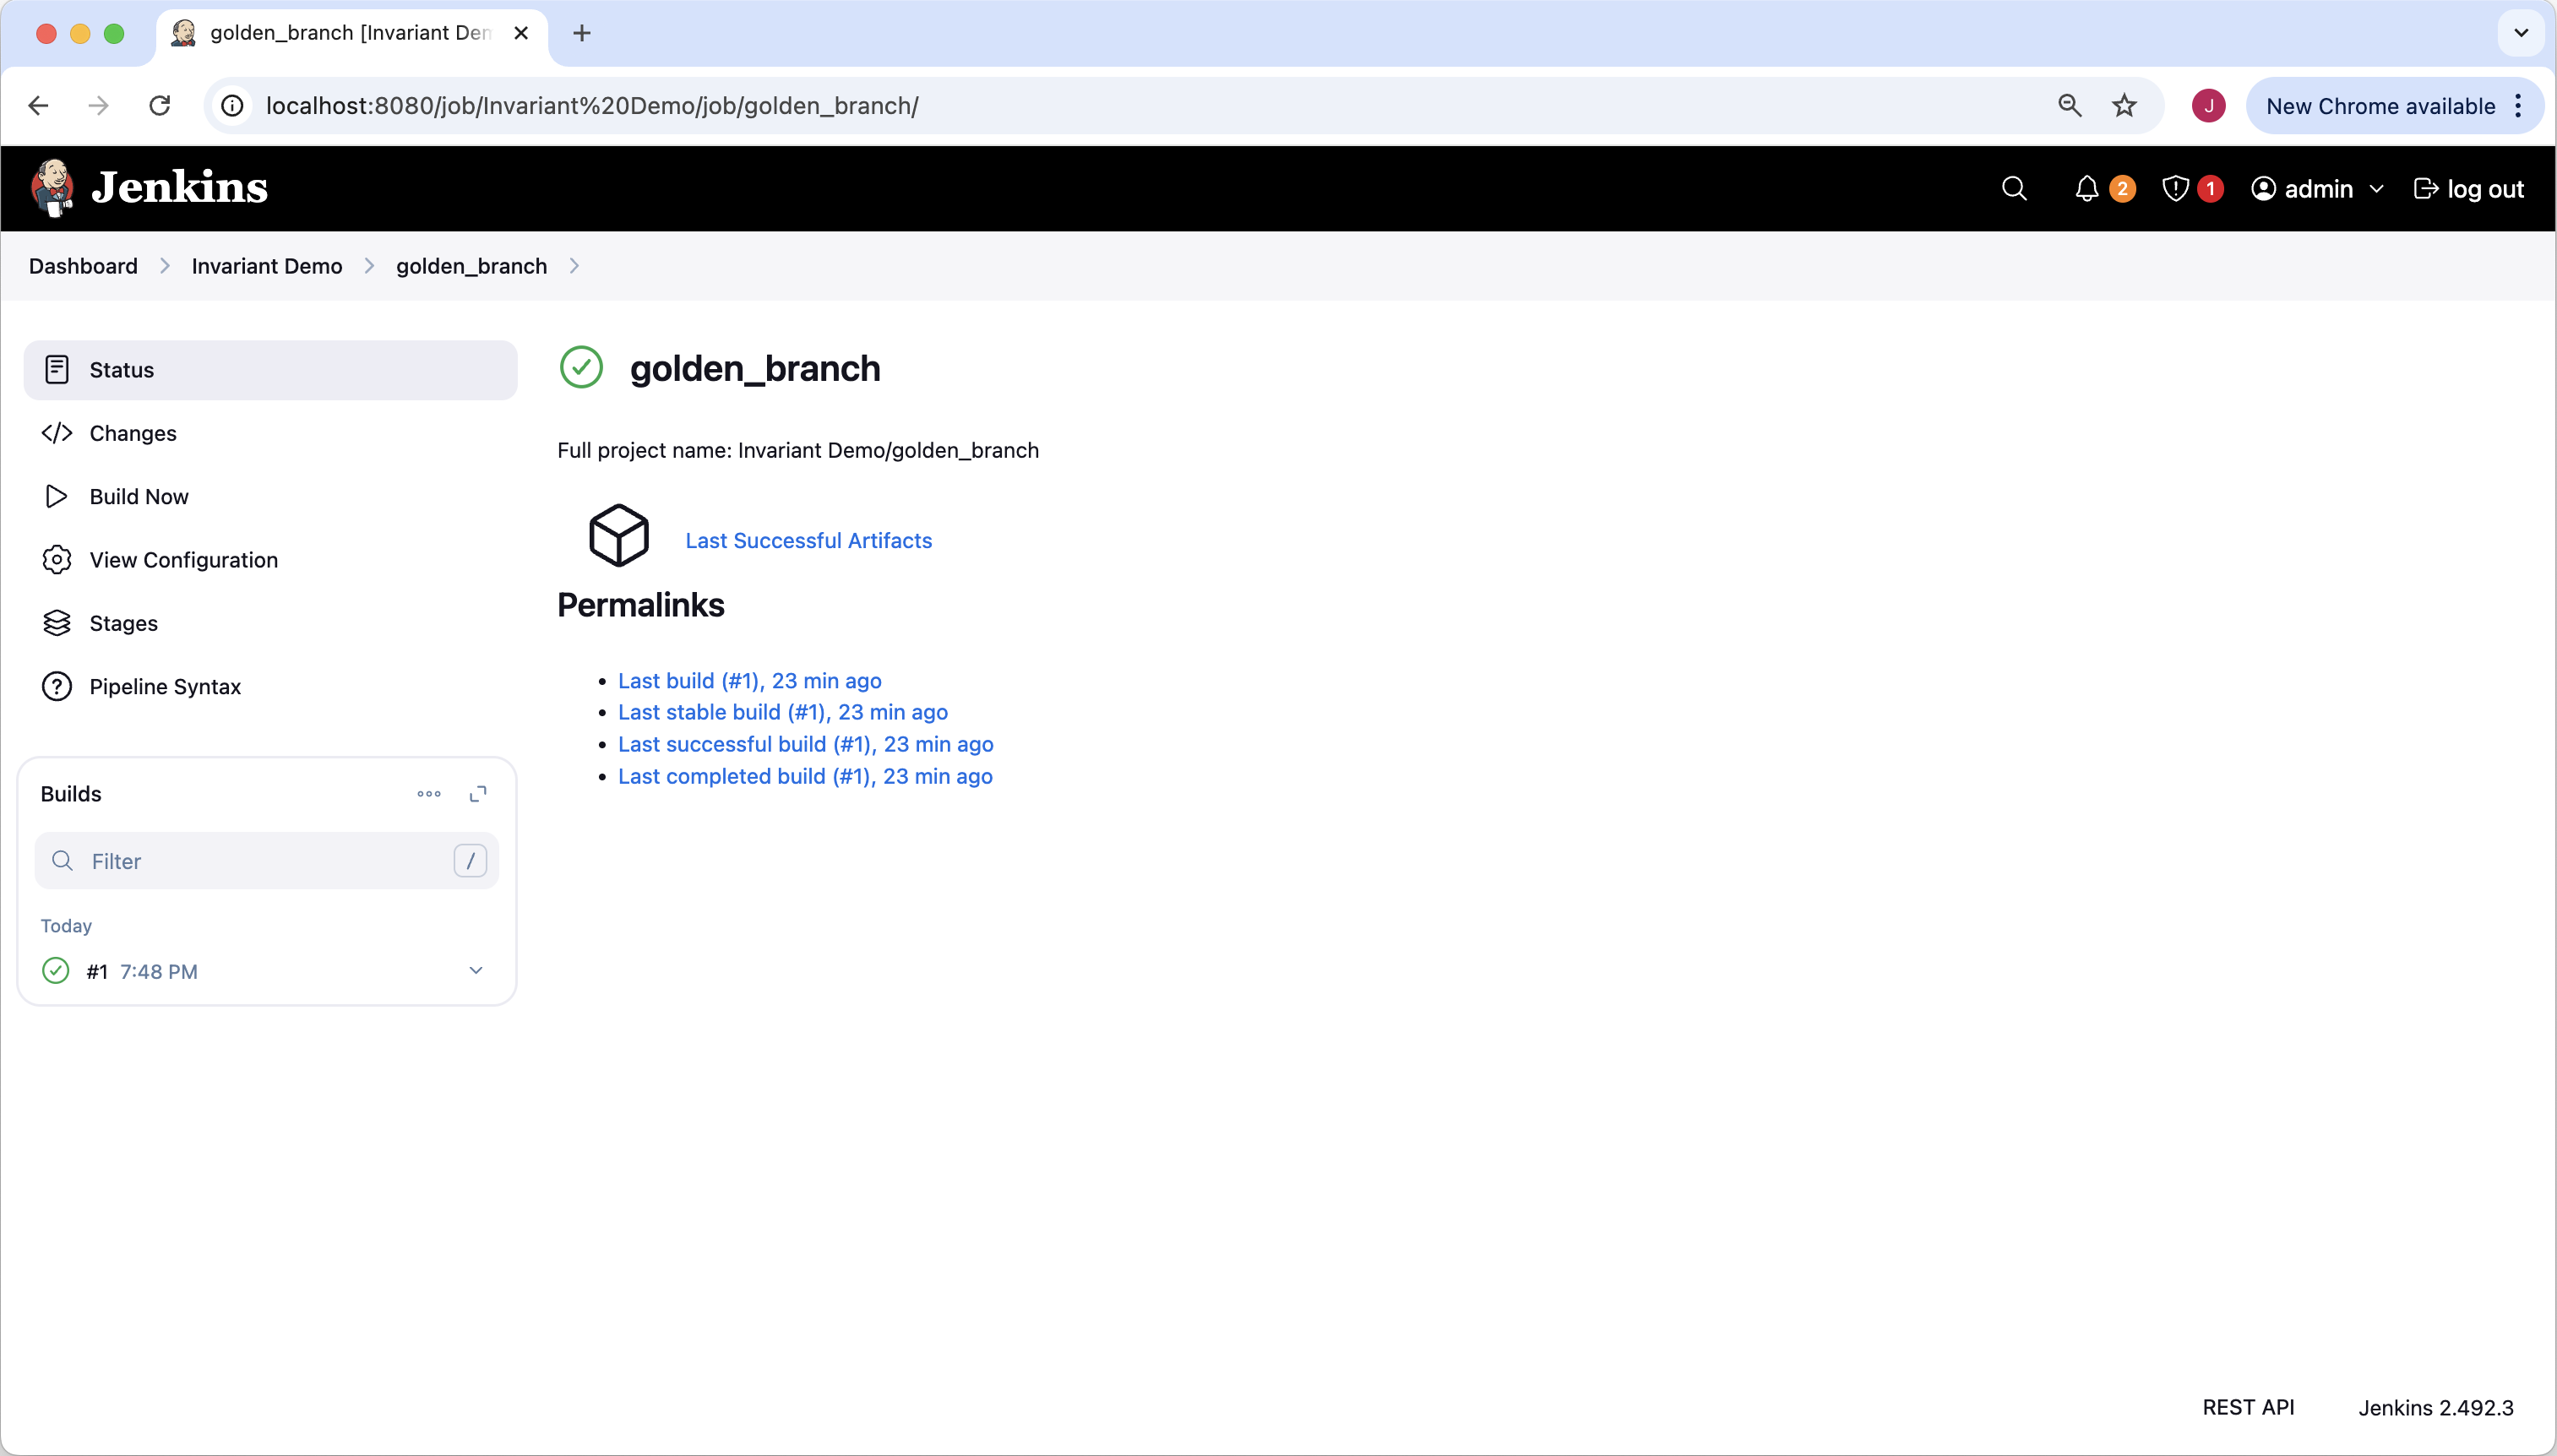
Jenkins has already scanned the baseline “golden network state” where we stored our configs the last time we updated the network. The green checkmark circle icon near the branch name (“golden_branch”) tells us this branch is passing all Invariant rule checks.
Now let’s look at our change_proposal branch. The red “X” circle icon tells us that this branch is not passing Invariant rule checks.
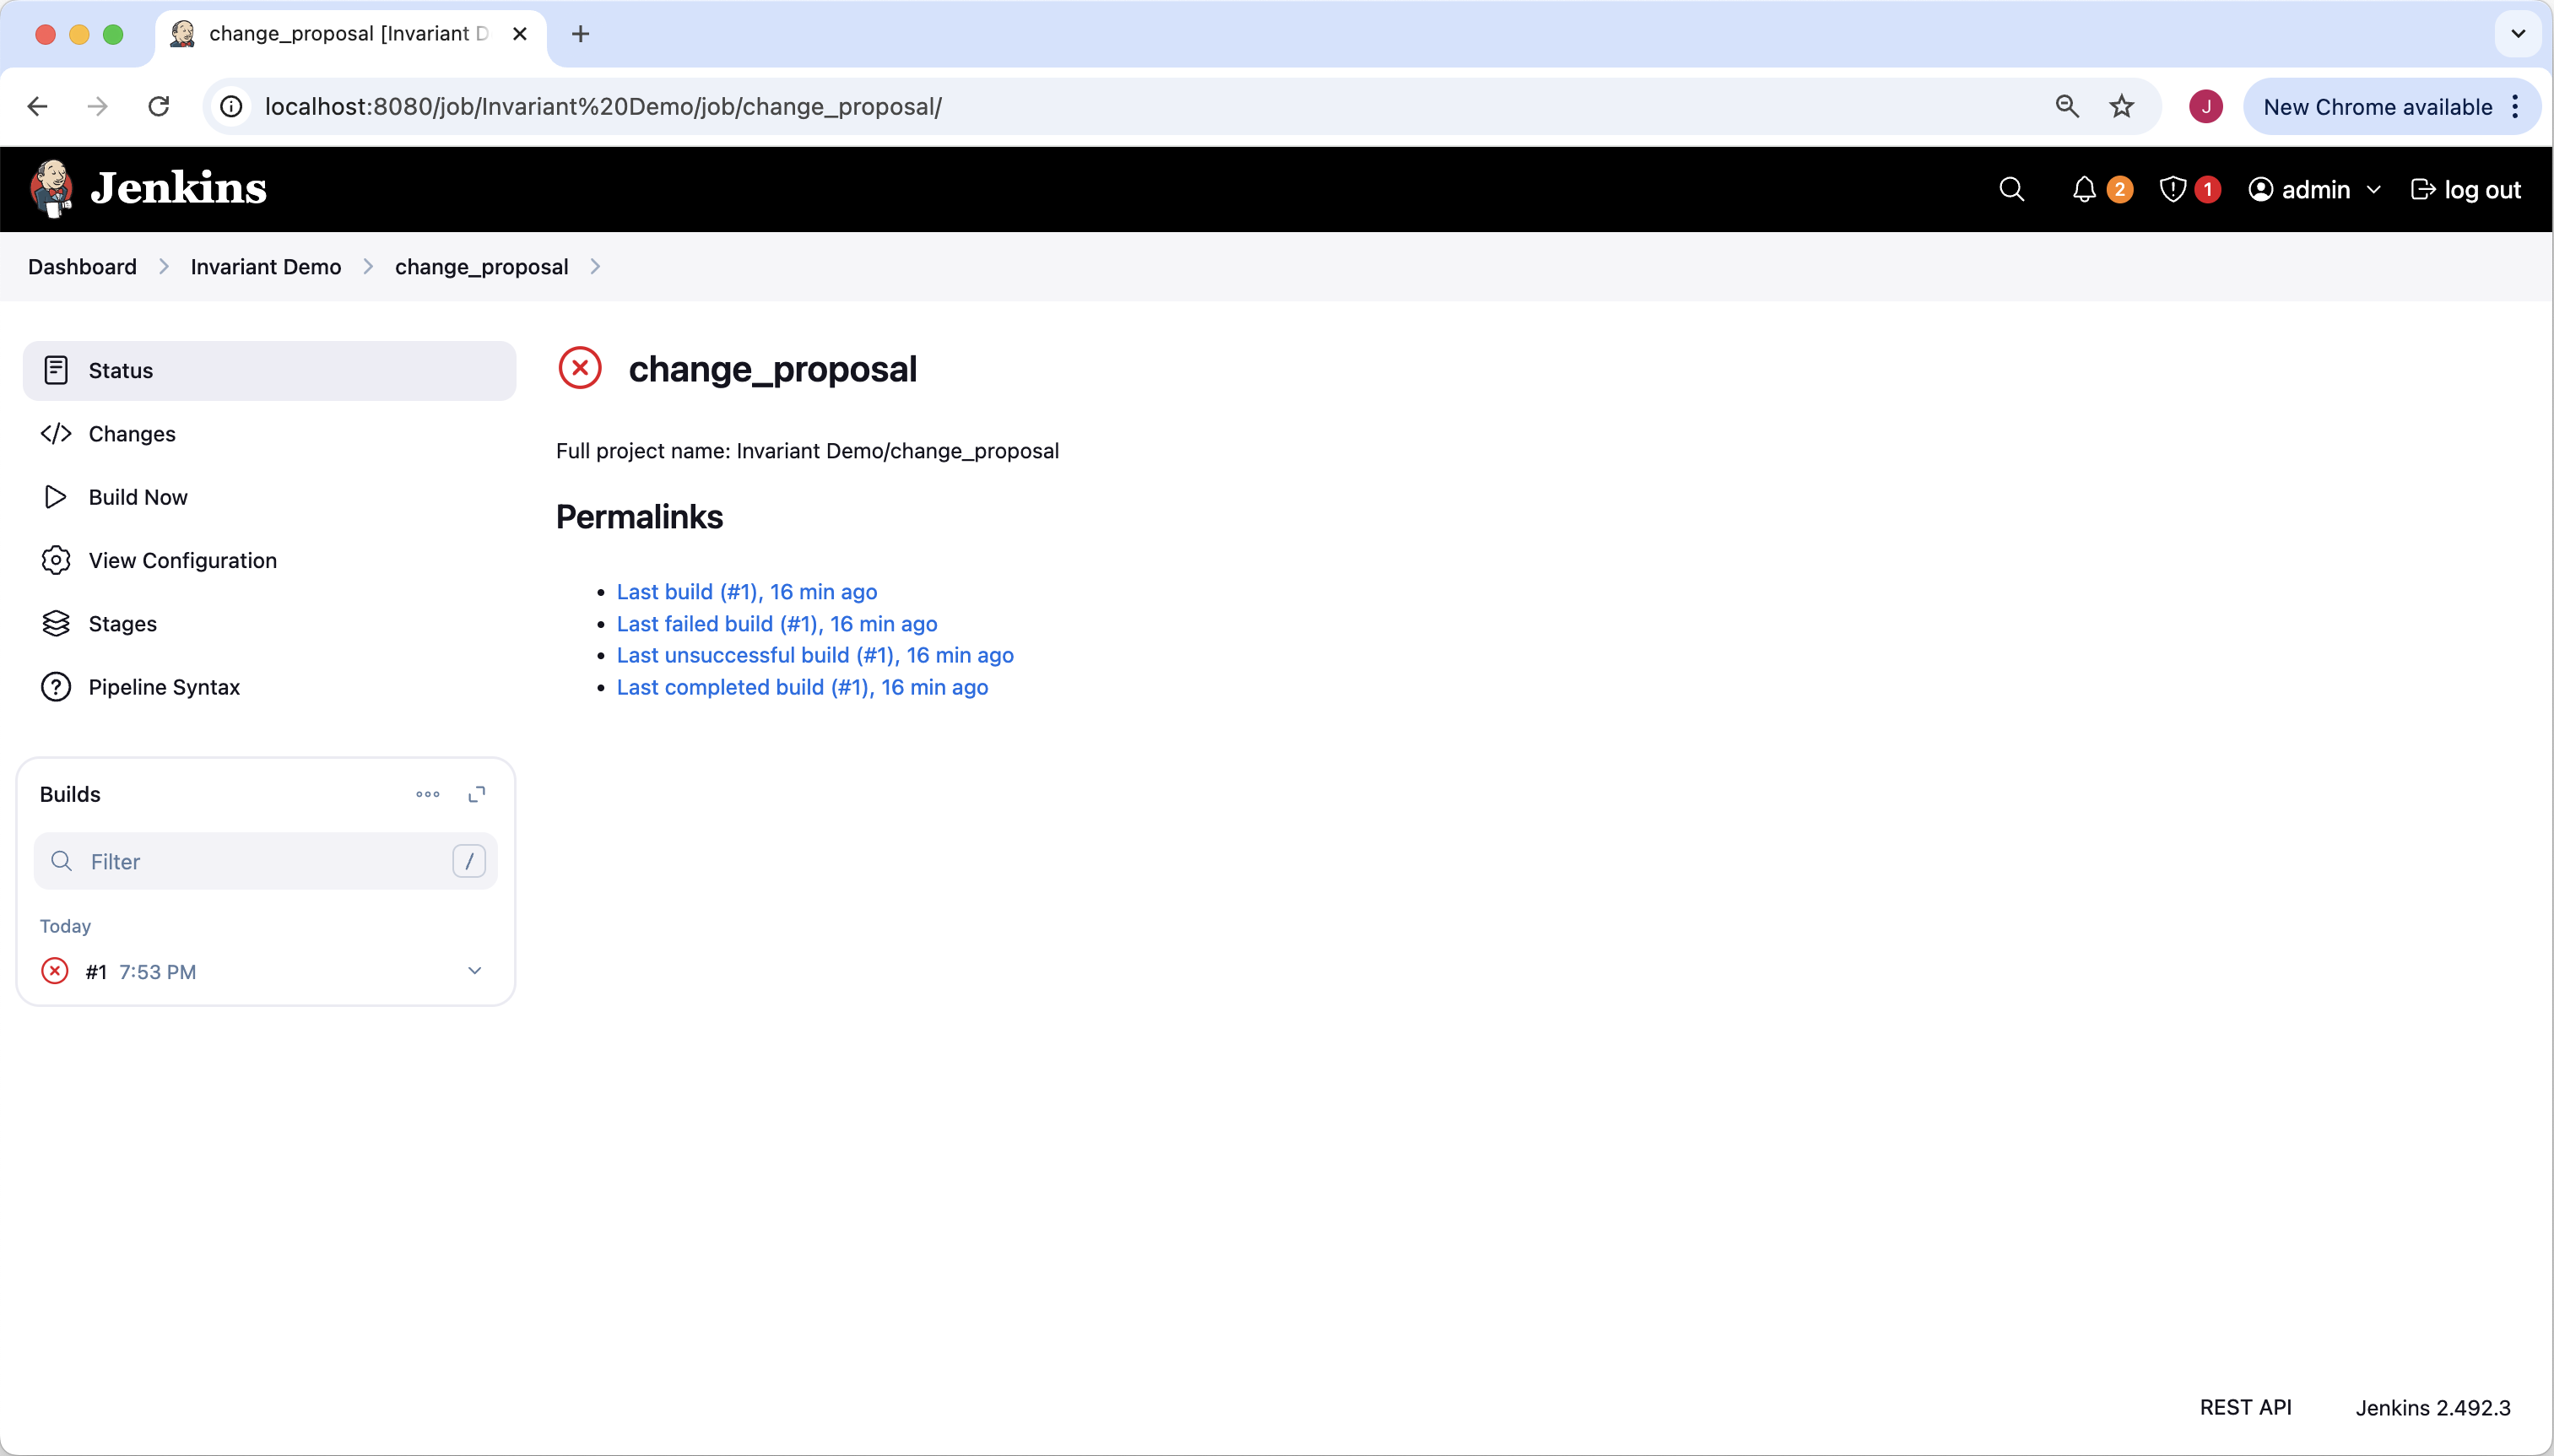
Let’s drill down to the specific build (#1).
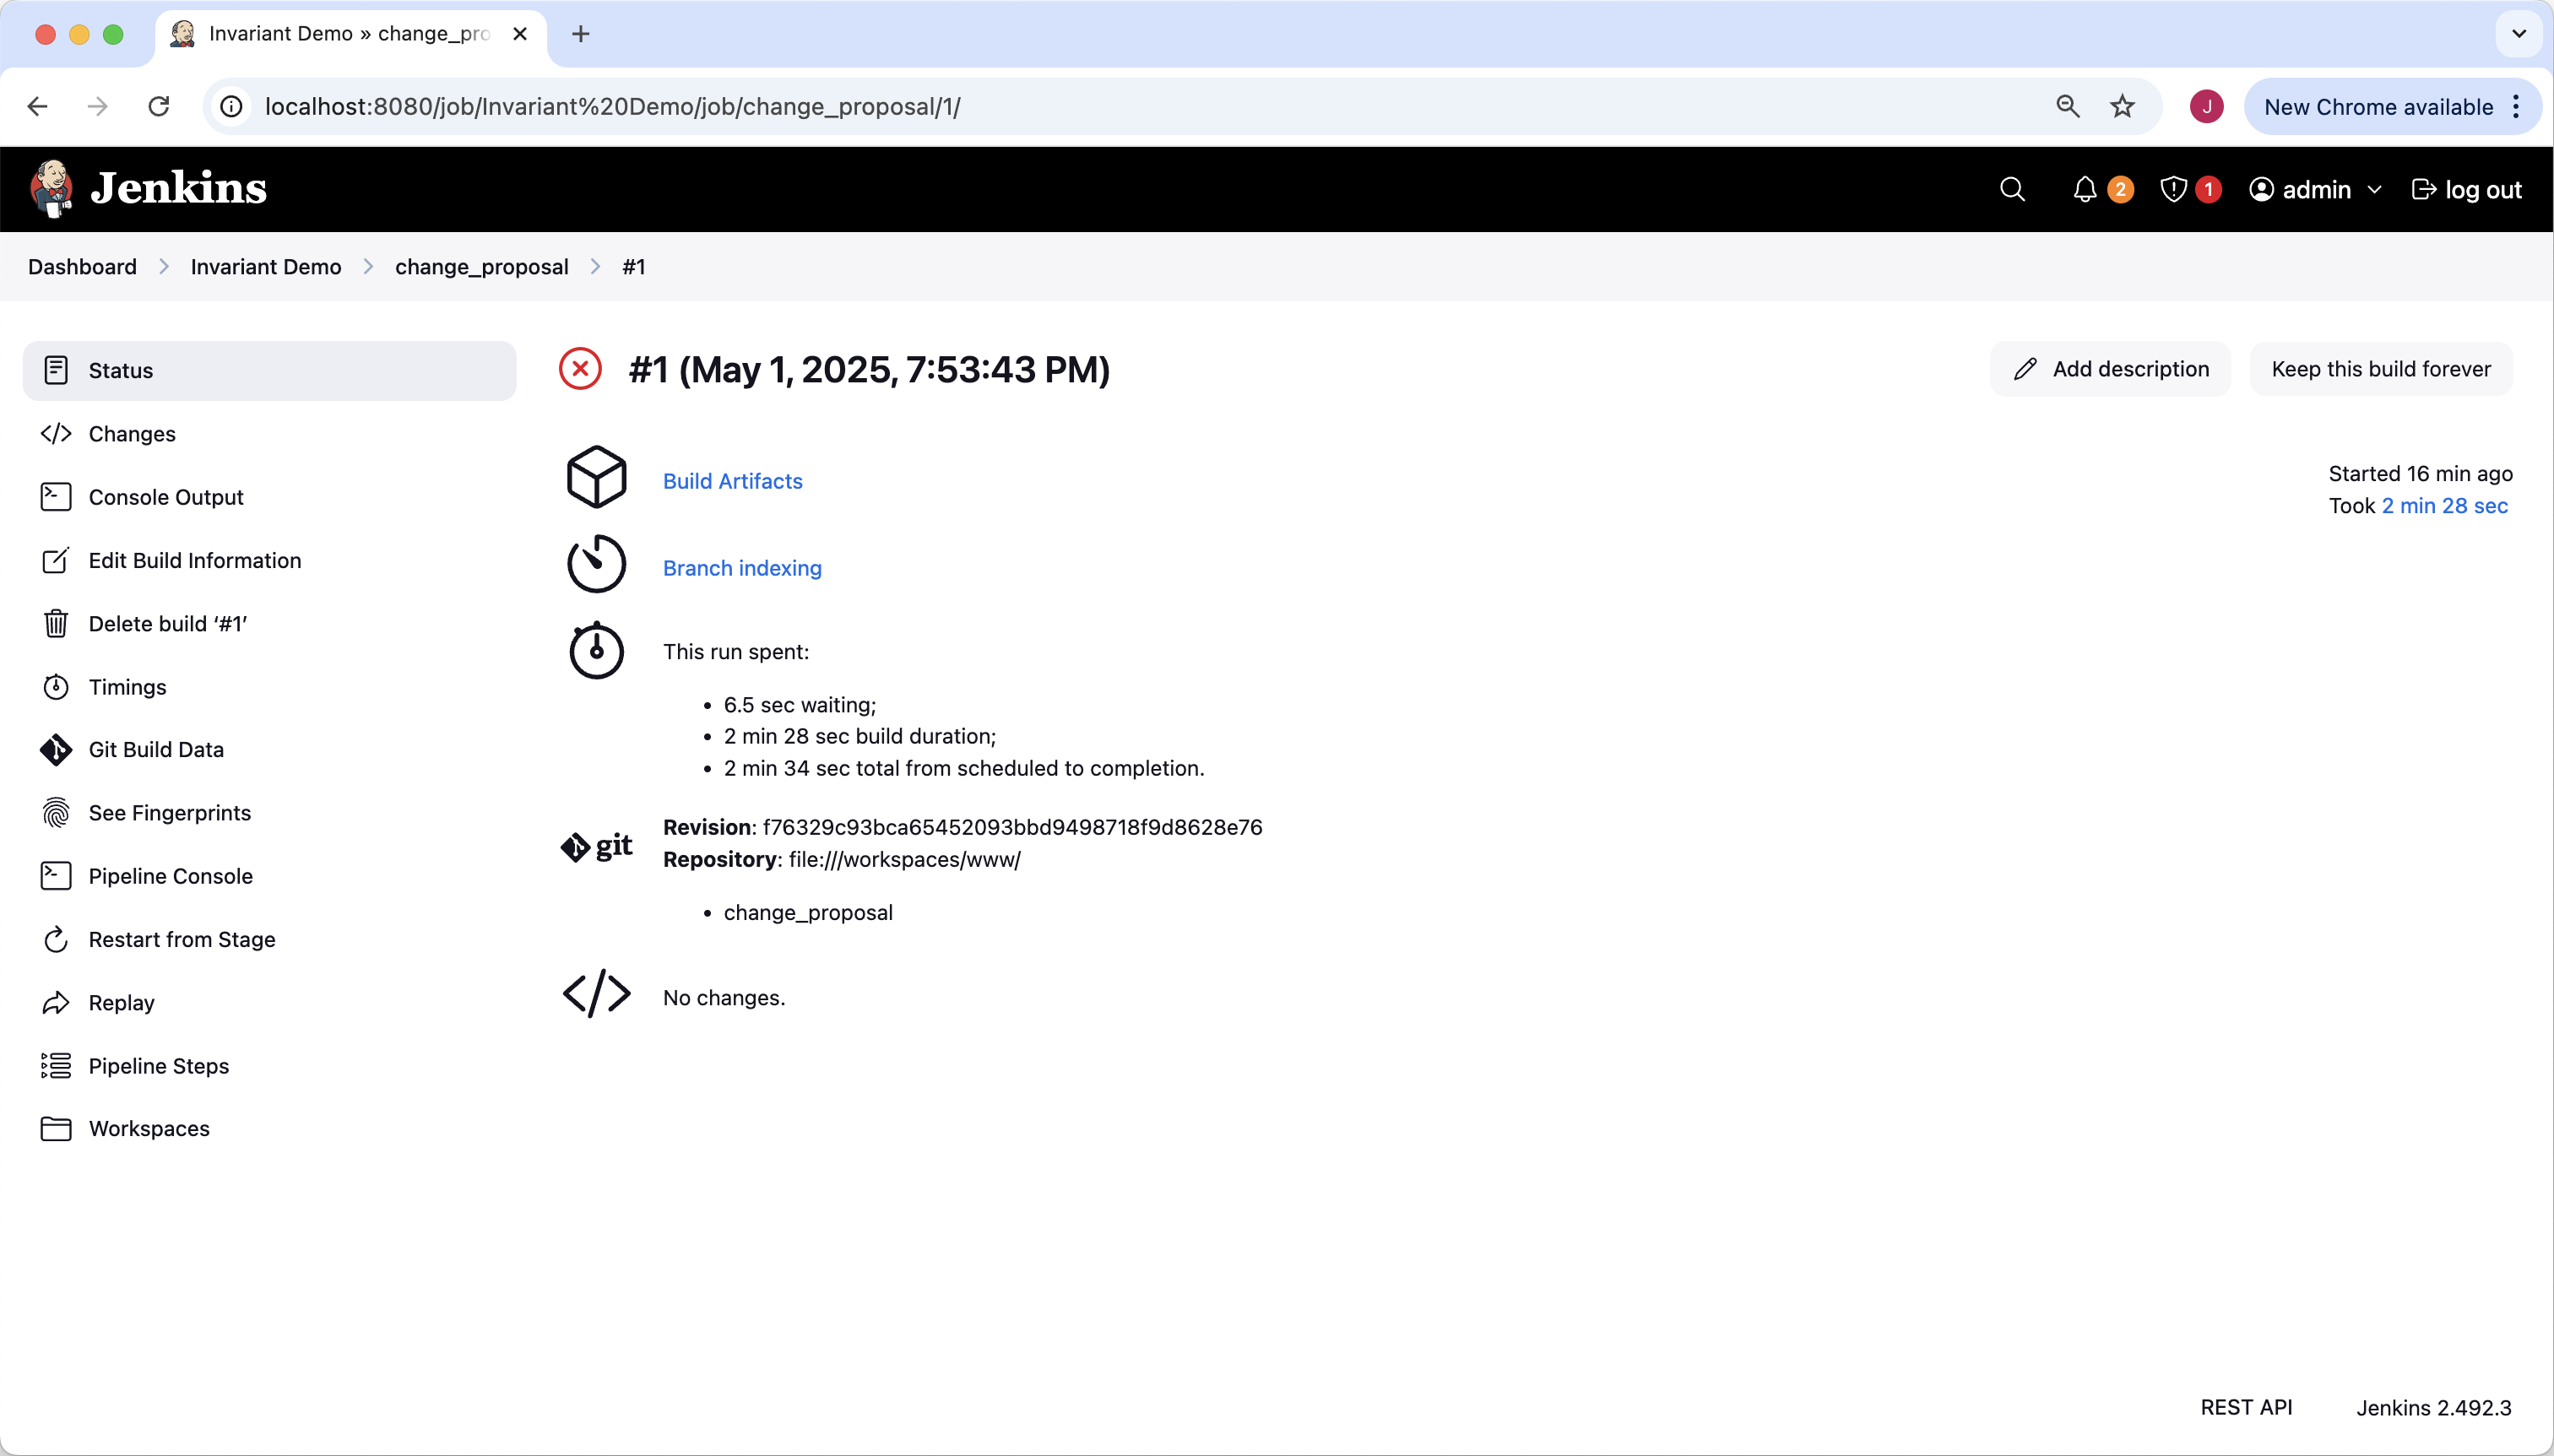
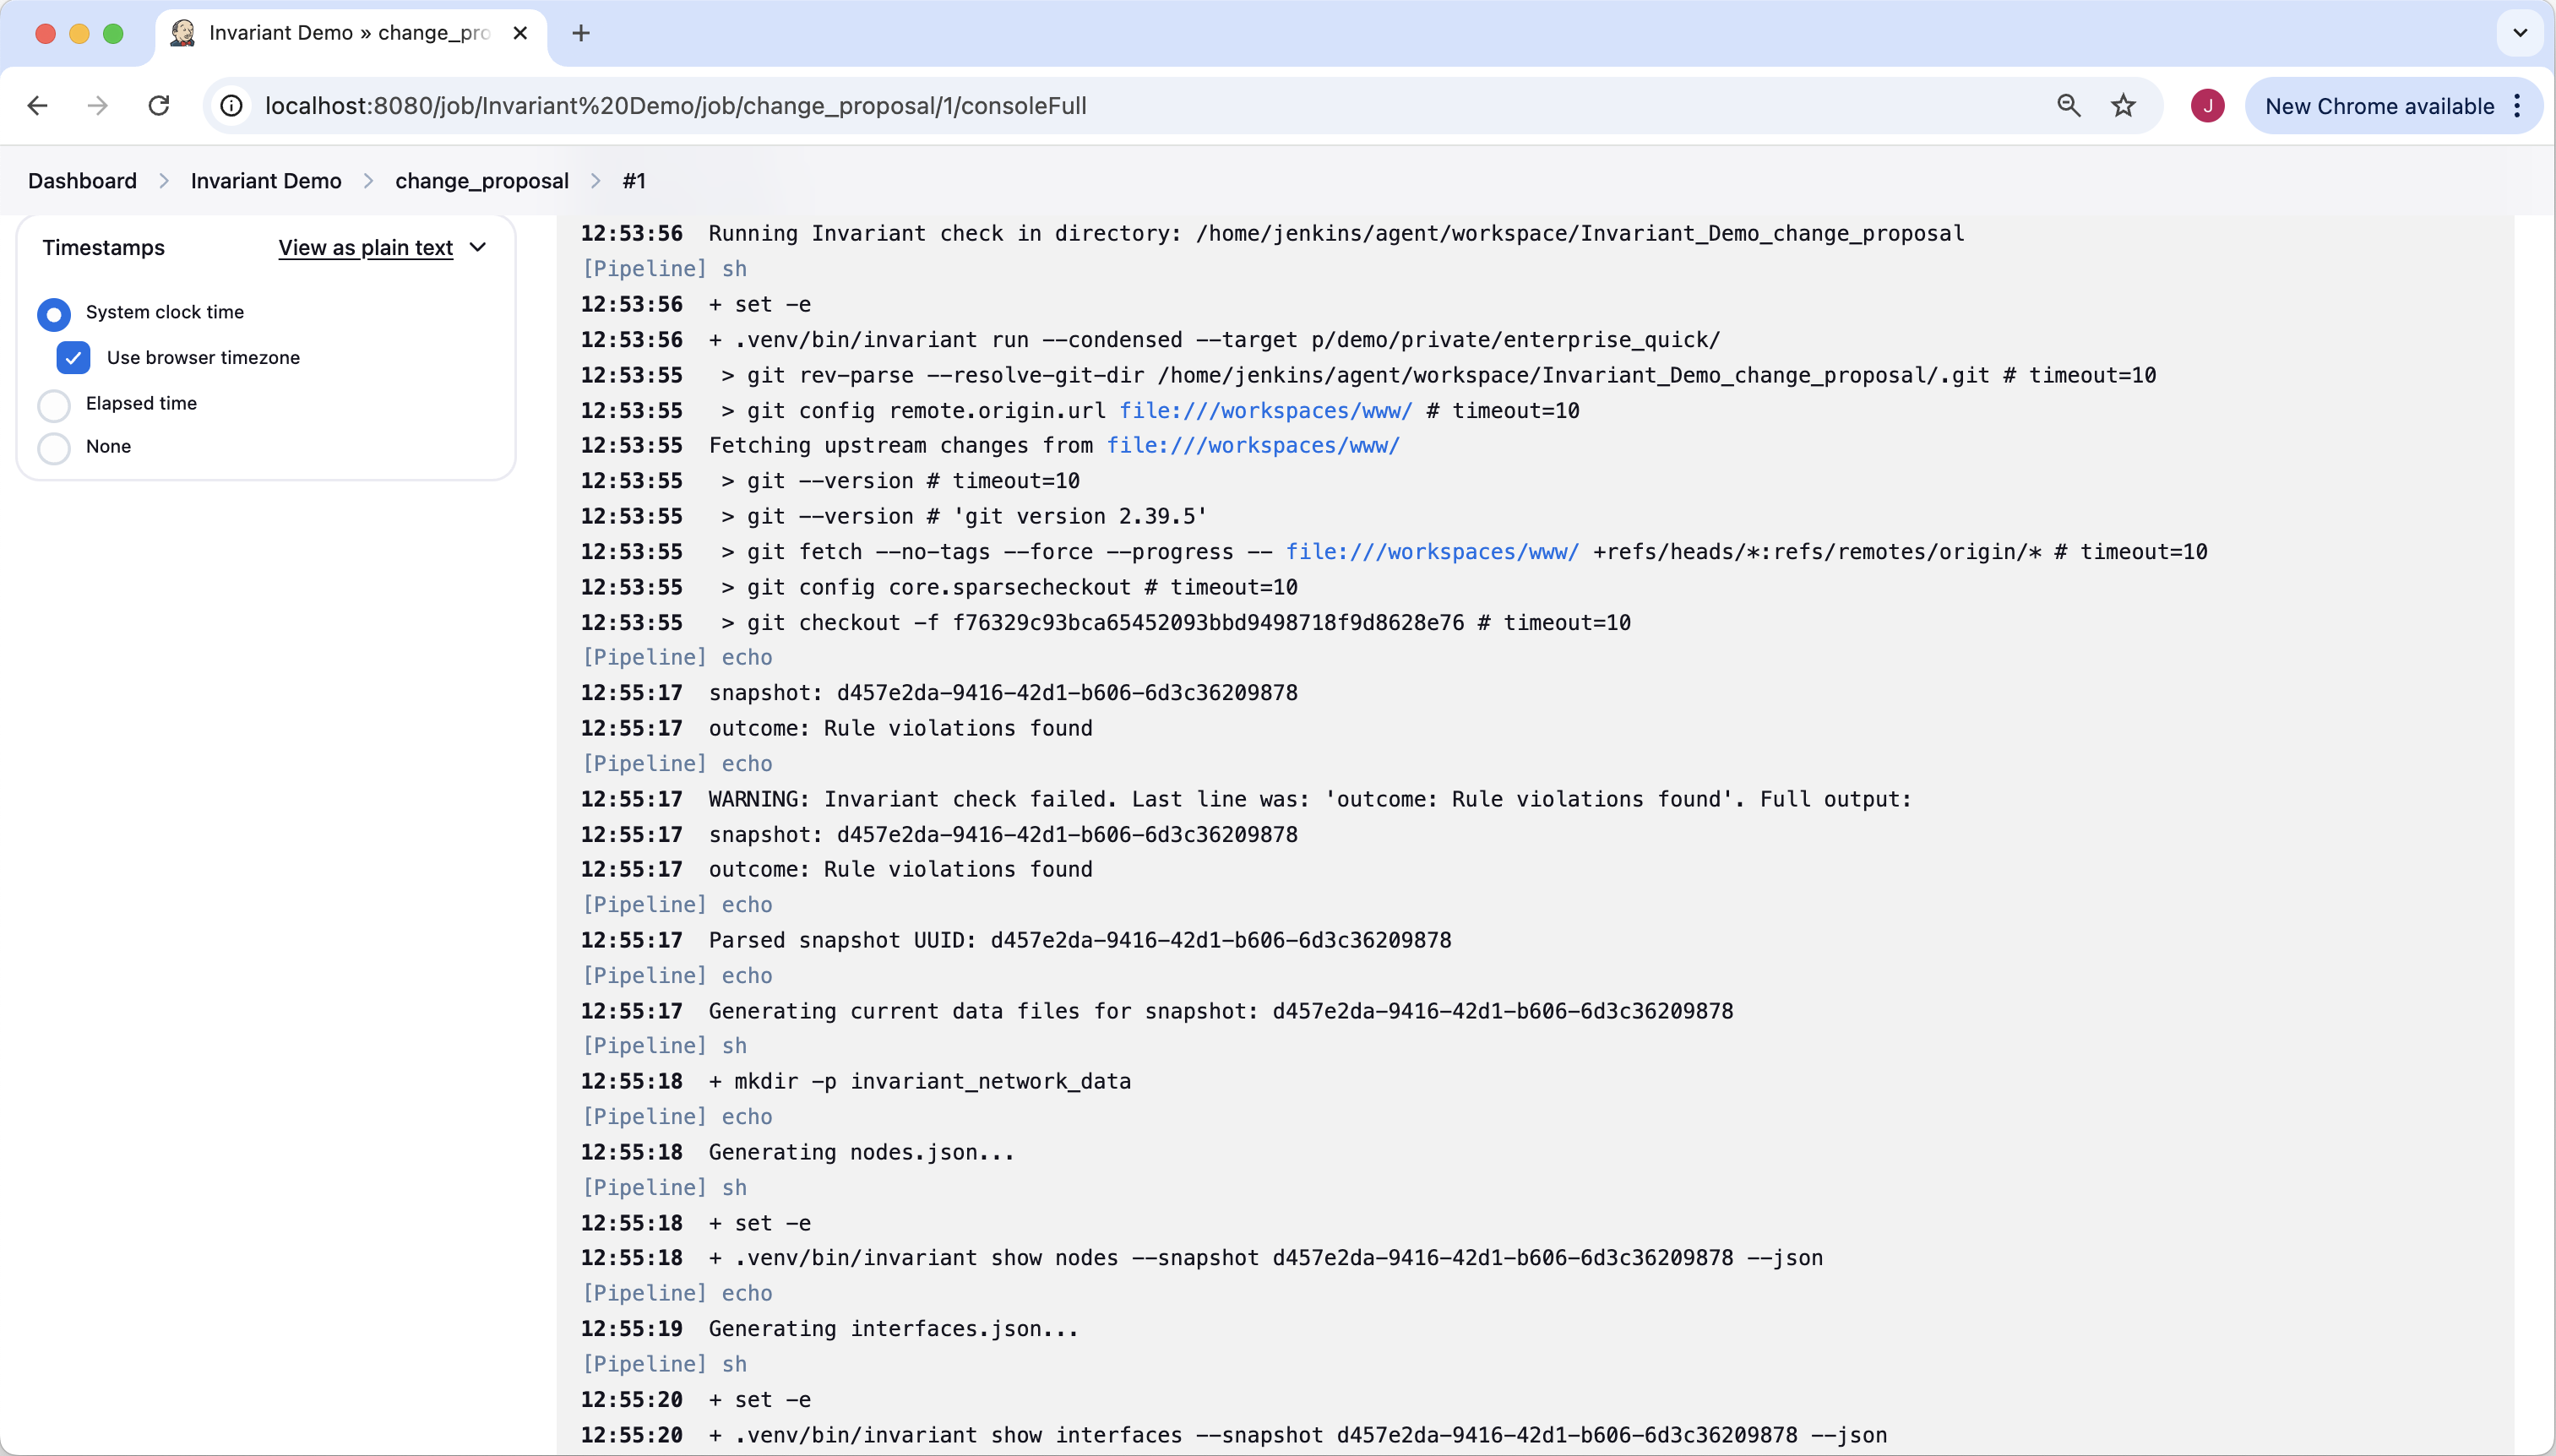
From here we will examine the console output. The console does show that the task used Invariant to analyze the network snapshot, and Invariant reported “outcome: Rule violations found”. That is what we expected, but now let’s go deeper and find out which rules failed, and why.
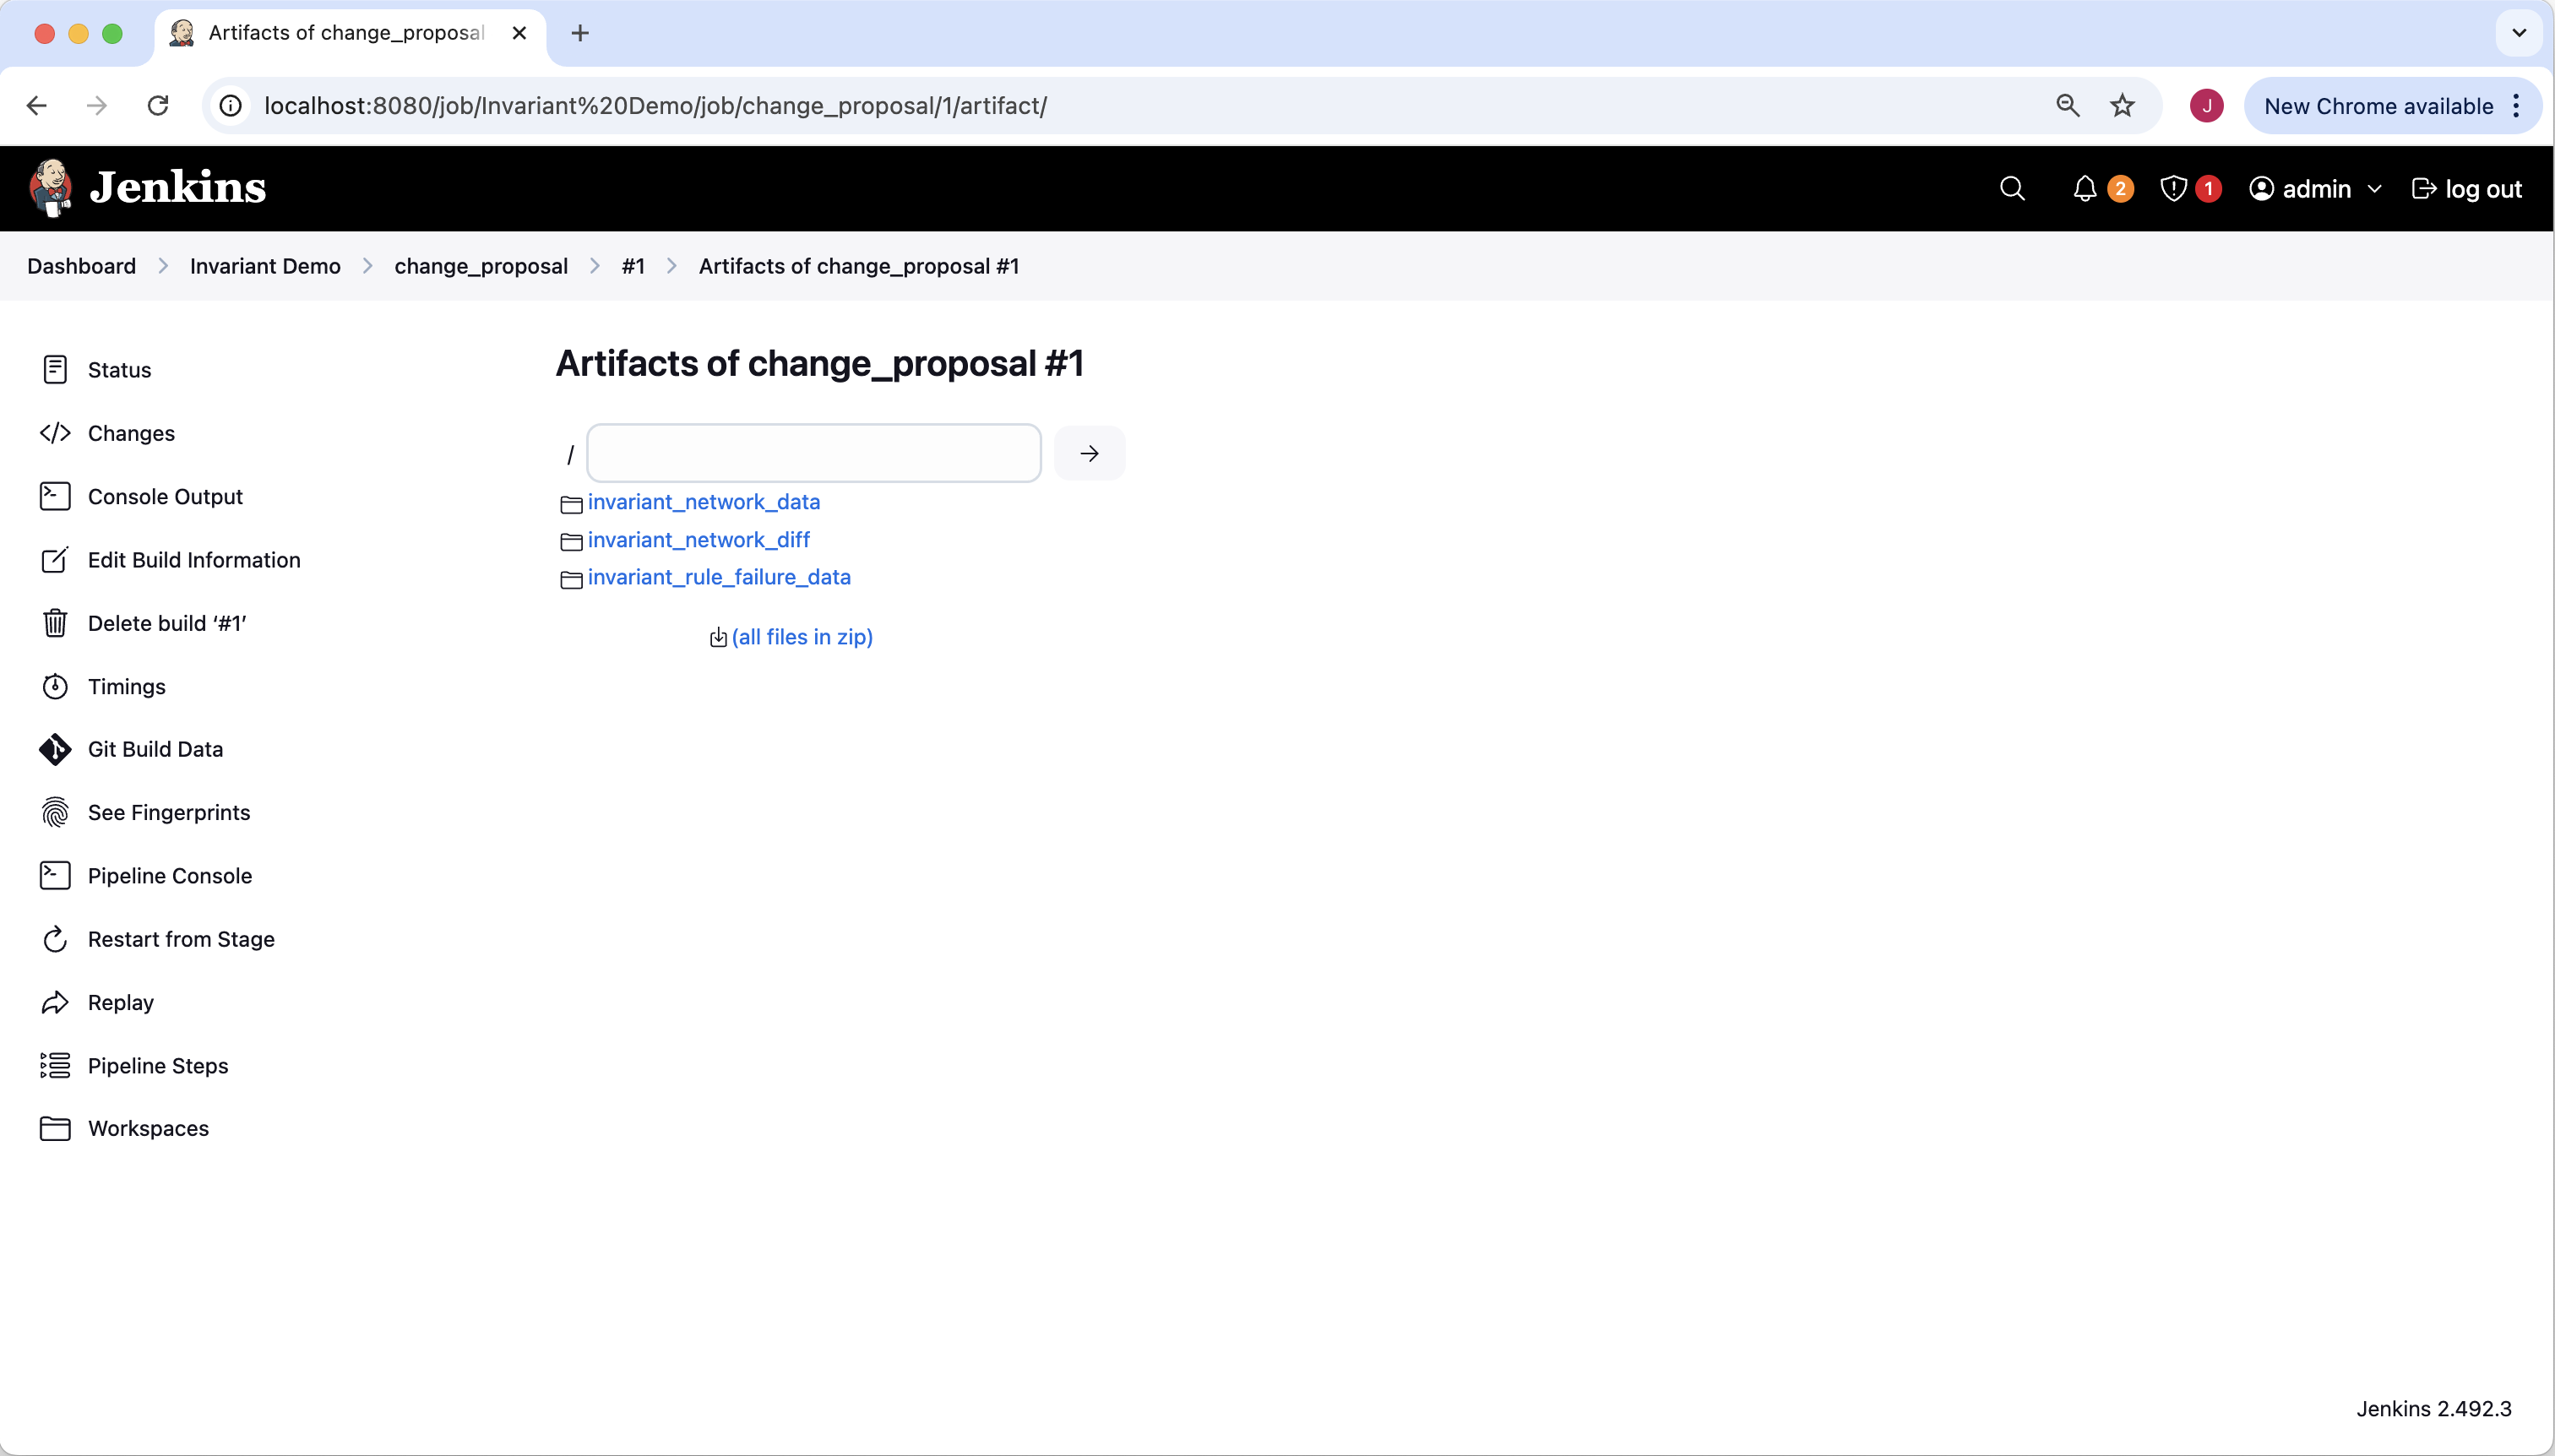
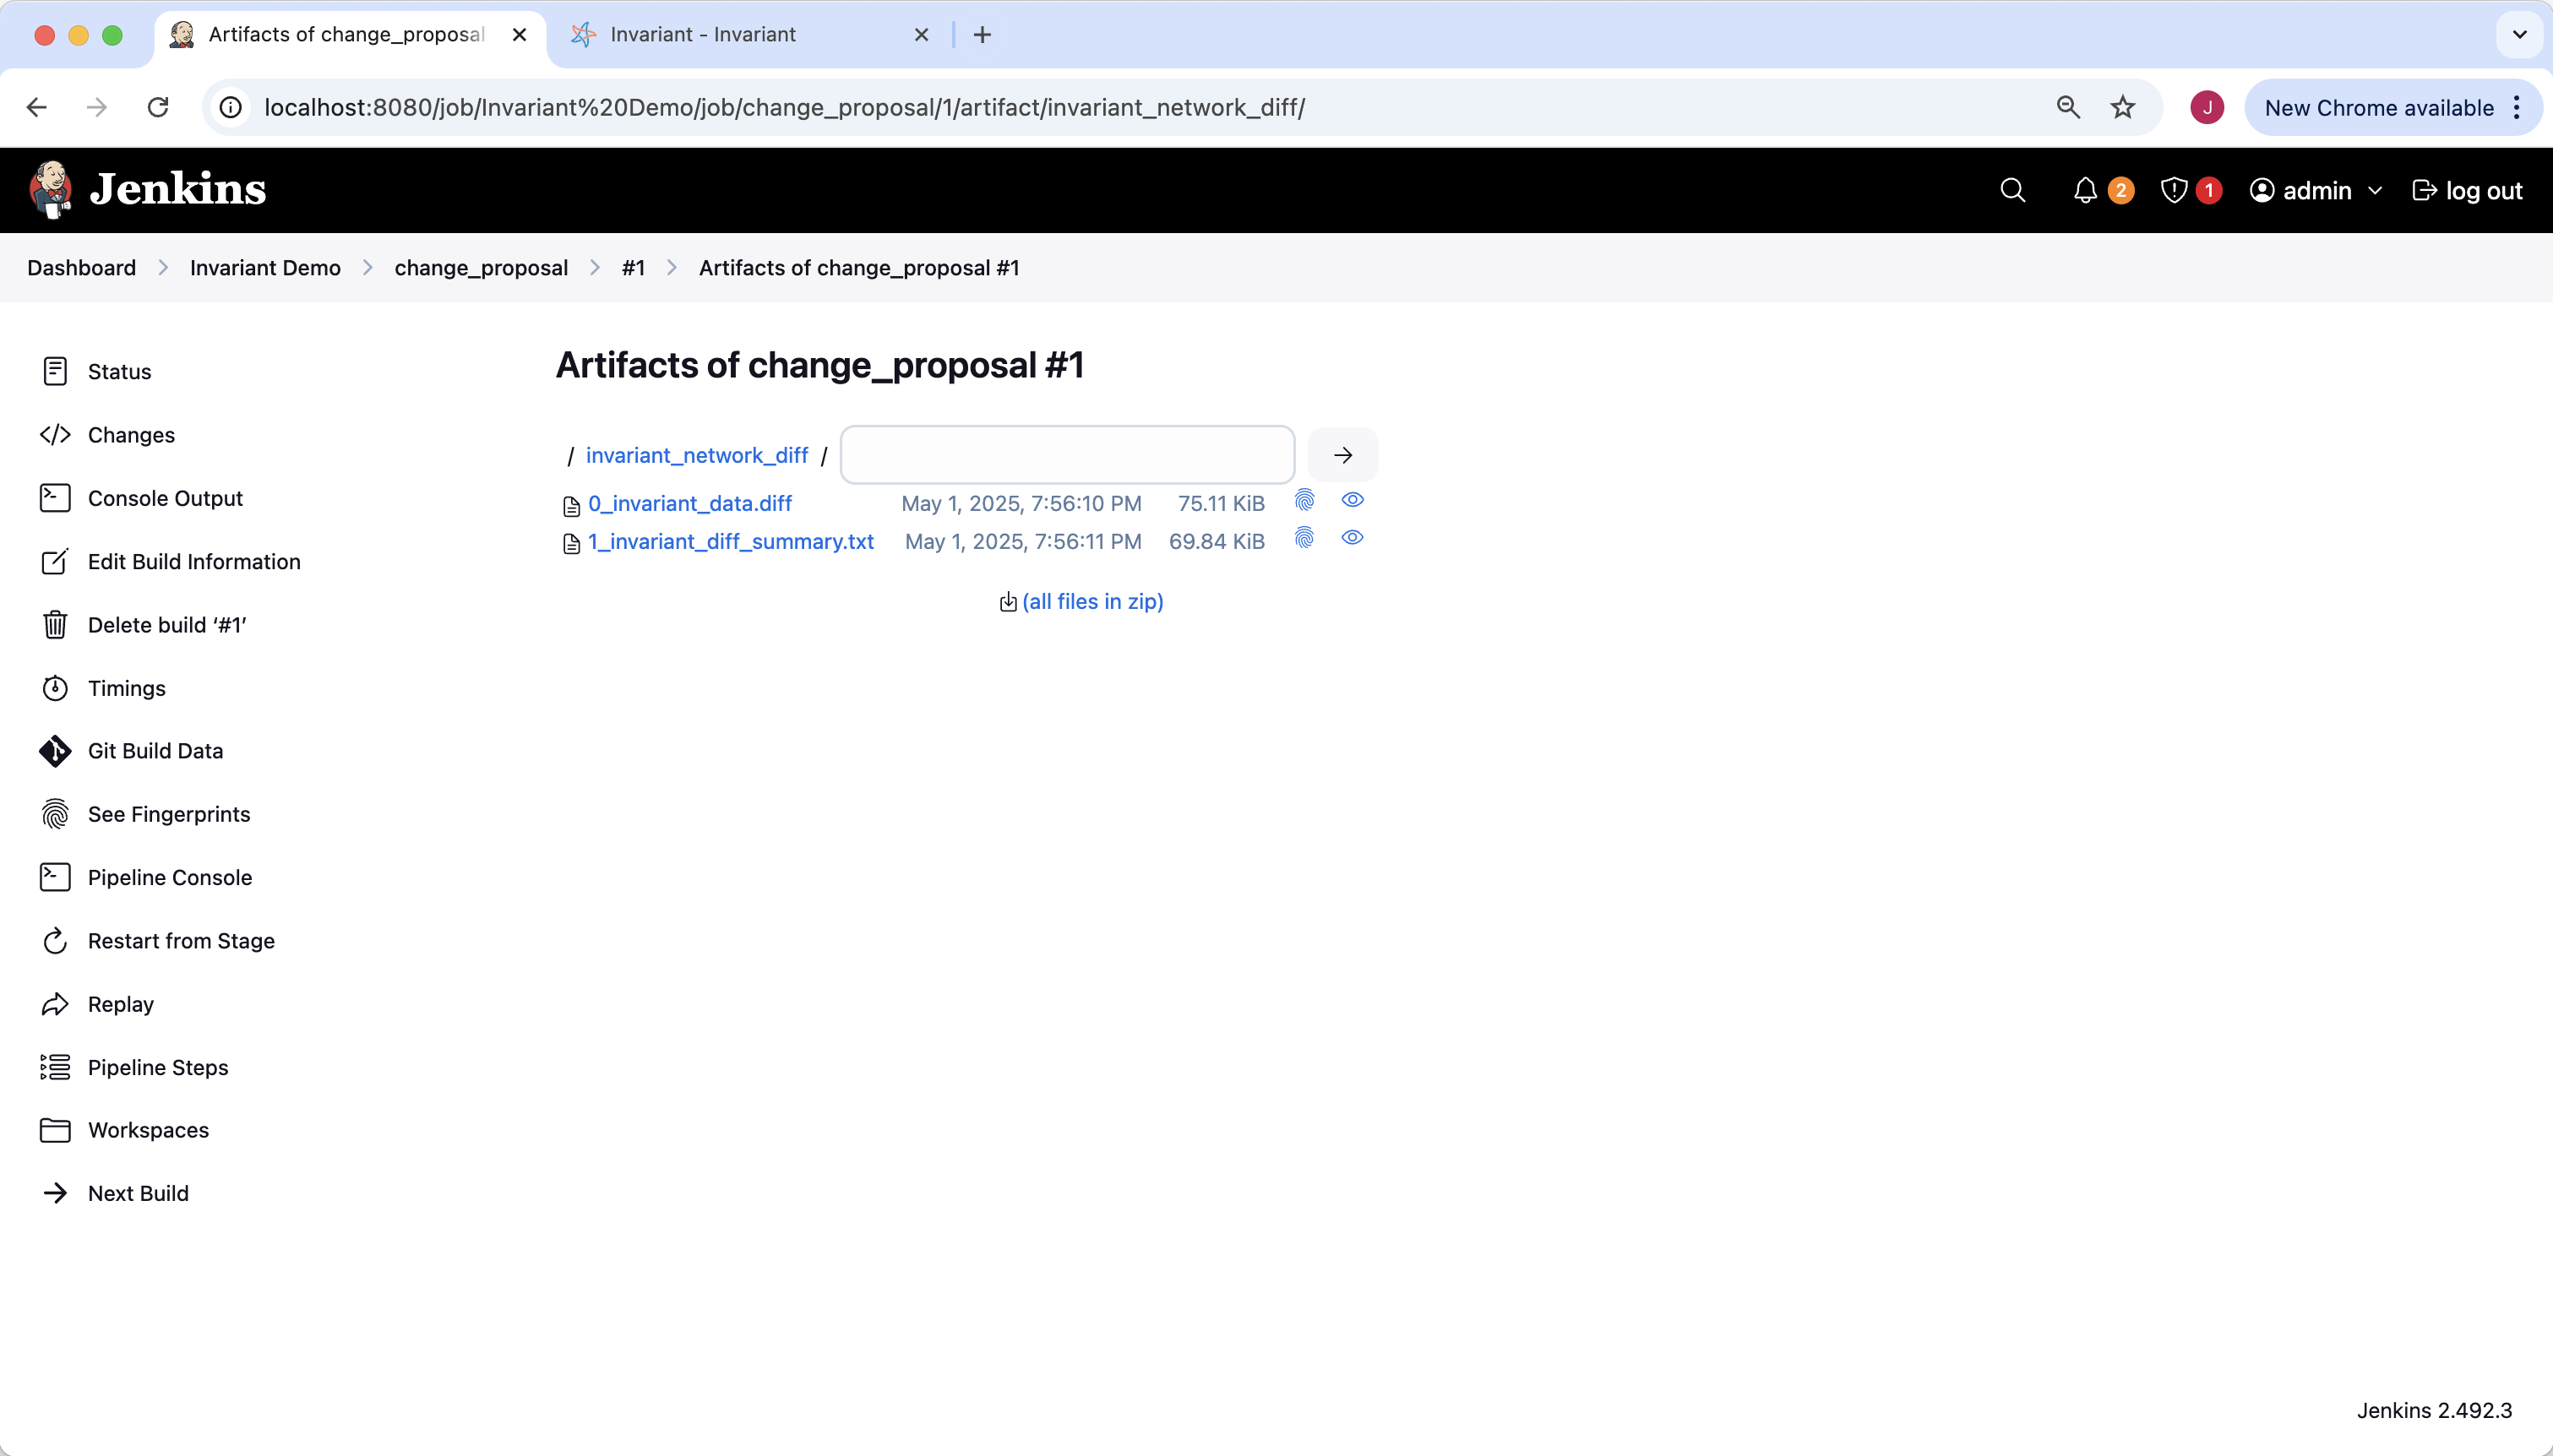
Back on to the specific build page (#1) there is a link for “Build Artifacts”. Artifacts are files produced by our build, which include detailed information about the network, the Invariant rule failure details, and a comparison against the golden branch.
While the invariant_rule_failure_data folder contains the raw JSON of all rule failures, traceroutes, and so on, it might be faster to just pop into the Invariant UI and explore from there.
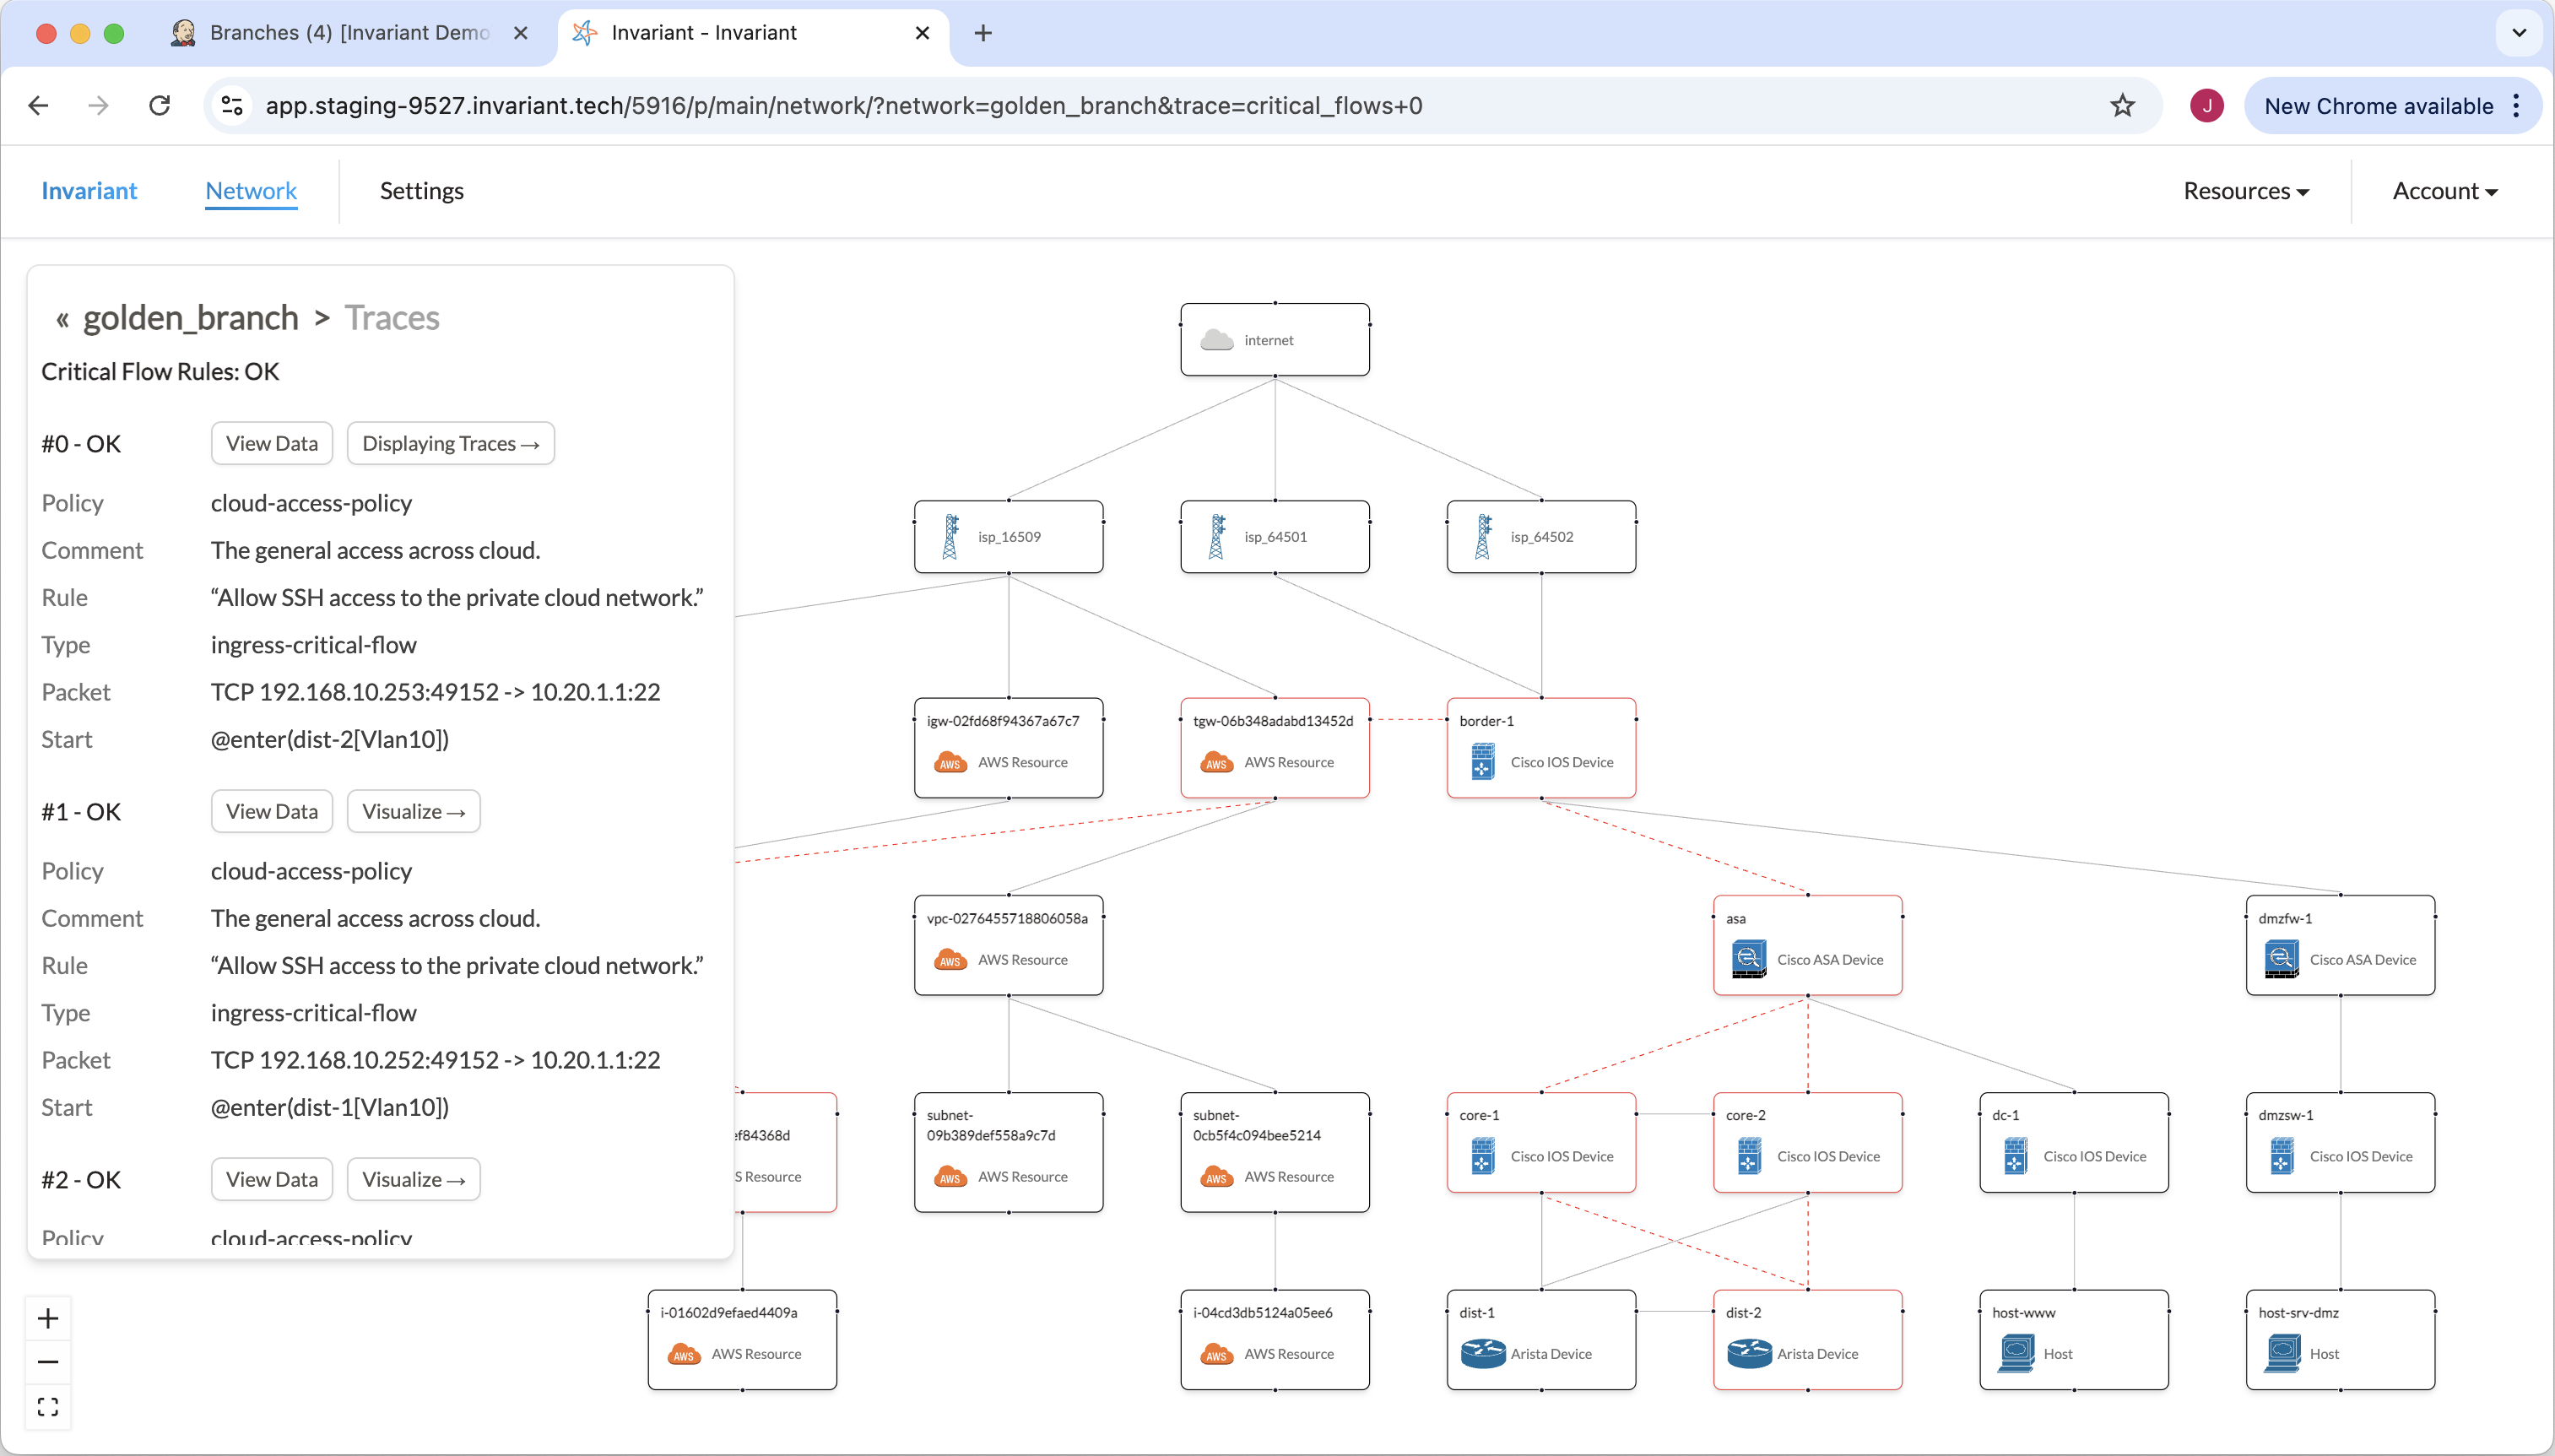
Here is what our golden_branch looks like in the Invariant UI. We can see on the left that 2/2 rules are passing. We also should notice how there is a layer 3 connection established between our border-1 device and our AWS transit gateway (tgw).
Again looking at our golden_branch, we can see that our first Invariant rule tests connectivity to our AWS infrastructure. The UI shows the paths that traffic can take, and we can see that the IPSec tunnel is critical for this connectivity requirement.
Now we can look at our change proposal in the Invariant UI. It’s apparent that two things are different: both rules are failing, and there is no longer a connection between border-1 and the AWS transit gateway.
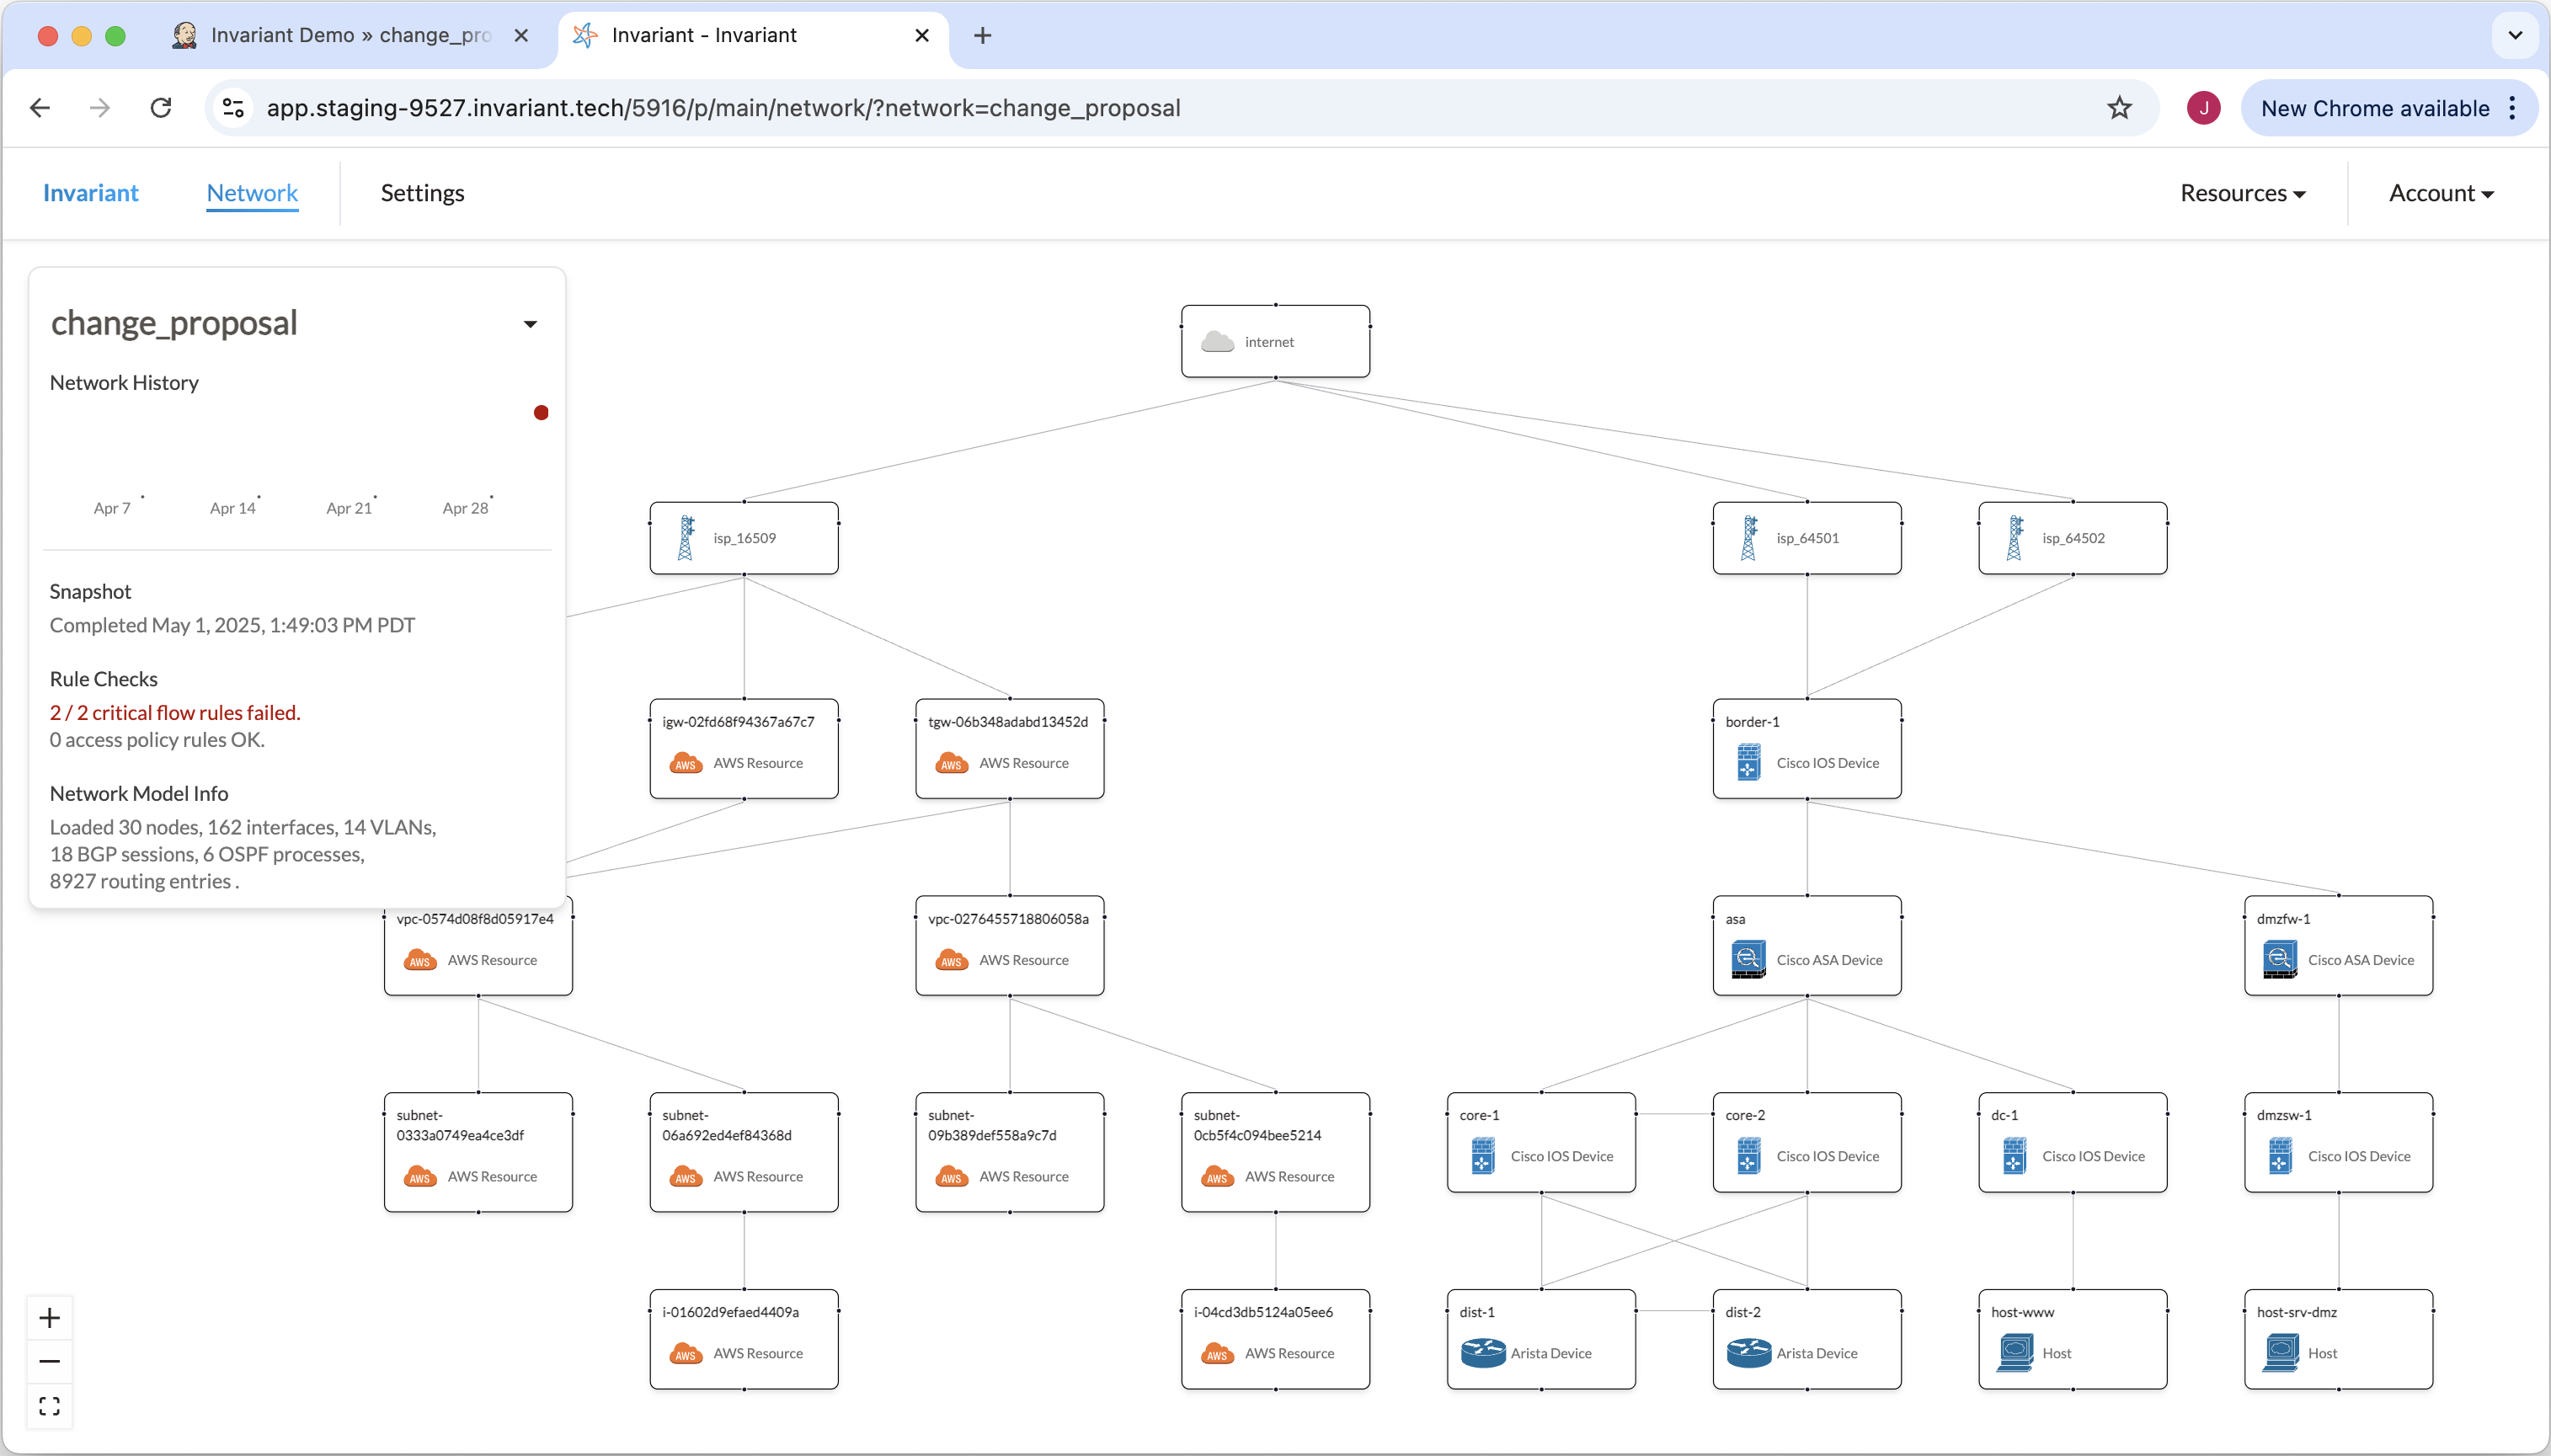
Inspecting the failing connectivity rule, we can see that the rule tries to reach a private IP address in 10.20.0.0/16 (AWS VPC). However, without the IPSec tunnel, and with no route for that /16, the test traffic hits the default route on border-1, exits the network, and is rejected by the ISP.

At this point we already have a pretty good sense of the issue. You should probably not deploy this change if losing connectivity to your AWS infrastructure is not acceptable. Had this change been deployed to the production network, the information explored thus far may already warrant reverting it.
Perhaps you only wanted to see what would happen if you applied a change to the network, which is valid.
Although this failure was designed to be obvious, it isn't always fully clear how a network change impacts the network’s behavior. Network configuration is famously non-obvious. Let’s go deeper into the tool to understand exactly what went wrong.
Root Cause
Invariant gives you tools to perform a root cause analysis of a network issue. To do this we will return to the Artifacts folder and examine the network data comparison to understand what went wrong.
We will look in the network diff folder. It contains two files, a .diff file and a .txt file. Both contain complete comparison details between our branch (change_proposal) and the golden branch (golden_branch). We will look at the summary.txt file (it is easier to read).
We can start to piece together the mechanics of the outage step by step. A great place to start is by looking at the difference between RIBs. We can see that several key routes would be lost with this change:
The border-1 device loses key /16 routes to the AWS network, which would have carried traffic over the transit gateway IPSec tunnels. The border-1 device also loses /30 routes established by the IPSec tunnel. Normally, BGP is established over these links, which allows AWS to advertise those /16 networks.
Note that next-hop on the /16 routes (in the golden branch) were set to 169.254.25.161 and 169.254.172.1, which would have been the AWS side of the IPSec tunnel.
(root level)  (routes.json)
- eight list entries removed:
  - Admin_Distance: 1
    Metric: 0
    Network: 10.20.0.0/16
    Next_Hop:
      type: ip
      interface: null
      ip: 169.254.25.161
    Next_Hop_IP: 169.254.25.161
    Next_Hop_Interface: dynamic
    Next_Hop_str: "ip 169.254.25.161"
    Node: border-1
    Protocol: static
    Tag: null
    VRF: default
  - Admin_Distance: 1
    Metric: 0
    Network: 10.20.0.0/16
    Next_Hop:
      type: ip
      interface: null
      ip: 169.254.172.1
    Next_Hop_IP: 169.254.172.1
    Next_Hop_Interface: dynamic
    Next_Hop_str: "ip 169.254.172.1"
    Node: border-1
    Protocol: static
    Tag: null
    VRF: default
  - Admin_Distance: 1
    Metric: 0
    Network: 10.30.0.0/16
    Next_Hop:
      type: ip
      interface: null
      ip: 169.254.25.161
    Next_Hop_IP: 169.254.25.161
    Next_Hop_Interface: dynamic
    Next_Hop_str: "ip 169.254.25.161"
    Node: border-1
    Protocol: static
    Tag: null
    VRF: default
  - Admin_Distance: 1
    Metric: 0
    Network: 10.30.0.0/16
    Next_Hop:
      type: ip
      interface: null
      ip: 169.254.172.1
    Next_Hop_IP: 169.254.172.1
    Next_Hop_Interface: dynamic
    Next_Hop_str: "ip 169.254.172.1"
    Node: border-1
    Protocol: static
    Tag: null
    VRF: default
  - Admin_Distance: 0
    Metric: 0
    Network: 169.254.25.160/30
    Next_Hop:
      type: interface
      interface: Tunnel1
      ip: null
    Next_Hop_IP: AUTO/NONE(-1l)
    Next_Hop_Interface: Tunnel1
    Next_Hop_str: "interface Tunnel1"
    Node: border-1
    Protocol: connected
    Tag: null
    VRF: default
  - Admin_Distance: 0
    Metric: 0
    Network: 169.254.25.162/32
    Next_Hop:
      type: interface
      interface: Tunnel1
      ip: null
    Next_Hop_IP: AUTO/NONE(-1l)
    Next_Hop_Interface: Tunnel1
    Next_Hop_str: "interface Tunnel1"
    Node: border-1
    Protocol: local
    Tag: null
    VRF: default
  - Admin_Distance: 0
    Metric: 0
    Network: 169.254.172.0/30
    Next_Hop:
      type: interface
      interface: Tunnel2
      ip: null
    Next_Hop_IP: AUTO/NONE(-1l)
    Next_Hop_Interface: Tunnel2
    Next_Hop_str: "interface Tunnel2"
    Node: border-1
    Protocol: connected
    Tag: null
    VRF: default
  - Admin_Distance: 0
    Metric: 0
    Network: 169.254.172.2/32
    Next_Hop:
      type: interface
      interface: Tunnel2
      ip: null
    Next_Hop_IP: AUTO/NONE(-1l)
    Next_Hop_Interface: Tunnel2
    Next_Hop_str: "interface Tunnel2"
    Node: border-1
    Protocol: local
    Tag: null
    VRF: default
We can see that interfaces Tunnel1 and Tunnel2 were shut down administratively by the “shutdown” commands.
border-1[Tunnel1].Active  (interfaces.json)
  ± value change
    - true
    + false

border-1[Tunnel1].Admin_Up  (interfaces.json)
  ± value change
    - true
    + false

border-1[Tunnel1].Inactive_Reason  (interfaces.json)
  ± value change
    -
    + Administratively down

border-1[Tunnel2].Active  (interfaces.json)
  ± value change
    - true
    + false

border-1[Tunnel2].Admin_Up  (interfaces.json)
  ± value change
    - true
    + false

border-1[Tunnel2].Inactive_Reason  (interfaces.json)
  ± value change
    -
    + Administratively down
Next, we can see that IPSec sessions would not be established between the Tunnel interfaces and AWS.
(root level)  (ipsec_edges.json)
- four list entries removed:
  - Remote_Source_Interface:
      hostname: tgw-06b348adabd13452d
      interface: external-vpn-01c45673532d3e33e-2
    Remote_Source_Interface_str: tgw-06b348adabd13452d[external-vpn-01c45673532d3e33e-2]
    Remote_Tunnel_Interface:
      hostname: tgw-06b348adabd13452d
      interface: vpn-vpn-01c45673532d3e33e-2
    Remote_Tunnel_Interface_str: tgw-06b348adabd13452d[vpn-vpn-01c45673532d3e33e-2]
    Source_Interface:
      hostname: border-1
      interface: GigabitEthernet0/3
    Source_Interface_str: border-1[GigabitEthernet0/3]
    Tunnel_Interface:
      hostname: border-1
      interface: Tunnel2
    Tunnel_Interface_str: border-1[Tunnel2]
  - Remote_Source_Interface:
      hostname: border-1
      interface: GigabitEthernet0/3
    Remote_Source_Interface_str: border-1[GigabitEthernet0/3]
    Remote_Tunnel_Interface:
      hostname: border-1
      interface: Tunnel1
    Remote_Tunnel_Interface_str: border-1[Tunnel1]
    Source_Interface:
      hostname: tgw-06b348adabd13452d
      interface: external-vpn-01c45673532d3e33e-1
    Source_Interface_str: tgw-06b348adabd13452d[external-vpn-01c45673532d3e33e-1]
    Tunnel_Interface:
      hostname: tgw-06b348adabd13452d
      interface: vpn-vpn-01c45673532d3e33e-1
    Tunnel_Interface_str: tgw-06b348adabd13452d[vpn-vpn-01c45673532d3e33e-1]
  - Remote_Source_Interface:
      hostname: border-1
      interface: GigabitEthernet0/3
    Remote_Source_Interface_str: border-1[GigabitEthernet0/3]
    Remote_Tunnel_Interface:
      hostname: border-1
      interface: Tunnel2
    Remote_Tunnel_Interface_str: border-1[Tunnel2]
    Source_Interface:
      hostname: tgw-06b348adabd13452d
      interface: external-vpn-01c45673532d3e33e-2
    Source_Interface_str: tgw-06b348adabd13452d[external-vpn-01c45673532d3e33e-2]
    Tunnel_Interface:
      hostname: tgw-06b348adabd13452d
      interface: vpn-vpn-01c45673532d3e33e-2
    Tunnel_Interface_str: tgw-06b348adabd13452d[vpn-vpn-01c45673532d3e33e-2]
  - Remote_Source_Interface:
      hostname: tgw-06b348adabd13452d
      interface: external-vpn-01c45673532d3e33e-1
    Remote_Source_Interface_str: tgw-06b348adabd13452d[external-vpn-01c45673532d3e33e-1]
    Remote_Tunnel_Interface:
      hostname: tgw-06b348adabd13452d
      interface: vpn-vpn-01c45673532d3e33e-1
    Remote_Tunnel_Interface_str: tgw-06b348adabd13452d[vpn-vpn-01c45673532d3e33e-1]
    Source_Interface:
      hostname: border-1
      interface: GigabitEthernet0/3
    Source_Interface_str: border-1[GigabitEthernet0/3]
    Tunnel_Interface:
      hostname: border-1
      interface: Tunnel1
    Tunnel_Interface_str: border-1[Tunnel1]
Key BGP sessions between AWS and border-1 cannot be established, failing with UNKNOWN_REMOTE.
(root level)  (bgp_session_compatibility.json)
- two list entries removed:              + two list entries added:
  - Address_Families: []                   - Address_Families: []
    Configured_Status: HALF_OPEN             Configured_Status: UNKNOWN_REMOTE
    Local_AS: 64512                          Local_AS: 64512
    Local_IP: 169.254.25.161                 Local_IP: 169.254.25.161
    Local_Interface: null                    Local_Interface: null
    Local_Interface_str: None                Local_Interface_str: None
    Node: tgw-06b348adabd13452d              Node: tgw-06b348adabd13452d
    Remote_AS: 64500                         Remote_AS: 64500
    Remote_IP: 169.254.25.162                Remote_IP: 169.254.25.162
    Remote_Interface: null                   Remote_Interface: null
    Remote_Interface_str: None               Remote_Interface_str: None
    Remote_Node: null                        Remote_Node: null
    Session_Type: EBGP_SINGLEHOP             Session_Type: EBGP_SINGLEHOP
    VRF: vrf-tgw-rtb-00e37bc5142347b03       VRF: vrf-tgw-rtb-00e37bc5142347b03
  - Address_Families: []                   - Address_Families: []
    Configured_Status: HALF_OPEN             Configured_Status: UNKNOWN_REMOTE
    Local_AS: 64512                          Local_AS: 64512
    Local_IP: 169.254.172.1                  Local_IP: 169.254.172.1
    Local_Interface: null                    Local_Interface: null
    Local_Interface_str: None                Local_Interface_str: None
    Node: tgw-06b348adabd13452d              Node: tgw-06b348adabd13452d
    Remote_AS: 64500                         Remote_AS: 64500
    Remote_IP: 169.254.172.2                 Remote_IP: 169.254.172.2
    Remote_Interface: null                   Remote_Interface: null
    Remote_Interface_str: None               Remote_Interface_str: None
    Remote_Node: null                        Remote_Node: null
    Session_Type: EBGP_SINGLEHOP             Session_Type: EBGP_SINGLEHOP
    VRF: vrf-tgw-rtb-00e37bc5142347b03       VRF: vrf-tgw-rtb-00e37bc5142347b03
Using this deep network behavior comparison data, we can confirm that the mechanics of the incident were as follows:
The Tunnel1, Tunnel2 interfaces were shut down. All connectivity to the AWS Transit Gateway was lost. Key /16 networks would have been advertised by AWS through BGP over the IPSec tunnels, but were no longer advertised.
Invariant Basics
This section walks through how the Jenkins script works. We'll start by introducing the functions of Invariant used by the script, then walk through the key parts of the script.
Setup
To connect to Invariant, we need the Invariant CLI, a Python CLI tool. The latest version can be installed using:
$ pip install invariant-client
Check the current installed version and the server connection using:
$ invariant --version
client: v1.10.3
server: v1.9.1
Invariant provides a tool for compiling a snapshot of your network. It can fetch information from Oxidized, directly from network devices (LibreNMS), and from your AWS REST API (Boto3). In this demo, that tool was already used to capture a network snapshot. We are now using that snapshot as a basis to test planned network changes before they go live (preflight). You can examine the structure of the network snapshot here: (link).
!! Key point: compiling a network snapshot is always performed by you on your local device using local credentials; the Invariant server has no access to your network or credentials.
Evaluate the network in the digital twin environment
Use the “invariant run” CLI command to evaluate the network in a digital twin environment.
$ invariant run --target demo/enterprise_quick/ --condensed
Let’s explain the parts:
“Invariant run” This command sends the network snapshot at the directory specified by --target to Invariant. Invariant will handle the heavy lifting of securely creating and destroying the digital twin network, understanding and processing the connectivity and access policy requirements, and compiling derived model information in a useful and diff-able format.
--target demo/enterprise_quick/ This is the local directory where the network snapshot exists.
--condensed This requests ‘condensed output’ which summarizes the outcome in a single line (pass / fail / error).
Fetch and diff deep network model attributes
Use the “invariant show” CLI command to fetch deep analysis reports. This includes interface details, BGP session status, RIBs on all devices, IPSec status, and more.
$ invariant show bgp_session_status --snapshot <uuid> --json > bgp_session_status.json
In the demo, we will loop over a list of well-known analysis reports. Once fetched, we can attach them to the Jenkins run as artifacts, and diff them against the prior state of the network or a “golden” state.
Automating with Jenkins
In our scenario, we want our network engineers to commit planned network changes to the ‘golden_branch’ branch. Jenkins will watch this branch for changes and kick off a task running Invariant tests and comparing the state of the ‘golden_branch’ branch to the state of the ‘release’ branch.
To accomplish this we must package our automation script as a Jenkinsfile. The full text of the file can be found in the demo repo. We will show key snippets here:
Evaluate the snapshot
withCredentials([string(credentialsId: 'invariant-api-token-id', variable: 'INVARIANT_API_TOKEN')]) {
Jenkins can store credentials as Jenkins secrets. Here we retrieve the 'invariant-api-token-id' secret and make it available to the invariant CLI, authenticating the client.
                            def output = sh(script: """
                                #!/bin/bash
                                set -e
                                .venv/bin/invariant run --condensed --target ${env.NETWORK_SNAPSHOT_DIR}
                            """, returnStdout: true).trim();
This runs the “invariant run” command, which sends the network snapshot at the directory specified by --target to Invariant. Invariant will handle the heavy lifting of securely creating and destroying the digital twin network, understanding and processing the connectivity and access policy requirements, and compiling derived model information in a useful and diff-able format.
--condensed This requests ‘condensed output’ which summarizes the outcome in a single line (pass / fail / error).
                            def linesArray = output.split('\n');
                            def firstLine = linesArray.length > 1 ? linesArray[0].trim() : "";
                            def lastLine = linesArray.length > 0 ? linesArray[-1].trim() : "";

                            // Validate outcome
                            if (lastLine == "outcome: All rules passed") {
                                echo "SUCCESS: Invariant check passed.";
                            } else {
                                echo "WARNING: Invariant check failed. Last line was: '${lastLine}'. Full output:\n${output}";
                                testFailed = true;
                            }
If all tests passed within Invariant, the last line of the output will always read “outcome: All rules passed”. We can use this to decide whether to pass or fail the task, so that failing Invariant tests fail the task.
Fetch and archive reports
                        env.INVARIANT_REPORTS.split(' ').each { type ->
                                sh(script: """
                                    #!/bin/bash
                                    set -e
                                    # withCredentials injects INVARIANT_API_TOKEN into env
                                    .venv/bin/invariant show ${type} --snapshot ${invariant_snapshot} --json > "${currentOutputDir}/${type}.json"
                                """);
                        };
Here we use the “invariant show” command, which downloads the analysis report named by ${type}. We request the output type using ‘--json’ and write the file for later use.
archiveArtifacts artifacts: "${currentOutputDir}/*.json", fingerprint: true;
This attaches all fetched reports to the Jenkins build for later examination.
Compare against current network
                            copyArtifacts(
                                projectName: targetProjectName,
                                selector: targetSelector,
                                filter: "${currentOutputDir}/*.json",
                                target: previousOutputDir,
                                fingerprintArtifacts: true,
                                flatten: true,
                            )
We can fetch the previously fetched network data from a prior Jenkins build for comparison. In our example we have a branch called “golden_branch”, comparisons are performed against the most recent build for that branch.
                            sh """
                                diff -urN "${previousOutputDir}/" "${currentOutputDir}/" > "${diffOutputDir}/0_invariant_data.diff" || true
                            """
This performs a diff between the network data in the comparison target (golden branch) and the current build.
Resources
-
Jenkinsfile and Jenkins Agent Dockerfile
https://github.com/InvariantTech/demo/tree/main/automation_jenkins/ -
The example network snapshot (working).
https://github.com/InvariantTech/demo/tree/main/enterprise_quick/